Support Articles
Enable Hibernation (Suspend to Disk)
Disclaimer
Hibernation is not officially supported on Pop!_OS as of 22.04. This documentation is supplied for your own explorative purposes. Future changes to your system configuration may break hibernation. Support or assistance may not be provided.
State of Hibernation on Pop!_OS
Hibernation is not currently enabled on Pop!_OS by default. There are several limitations that keep this from being a default:
- Pop!_OS' Default Partition Layout
- Use of a non-persistent encryption key for SWAP.
- Additional drive I/O used on Solid State Drives (SSDs)
- Depending on alloted RAM in a system, and size of NVMe/SSD drive(s), hibernation could add notable delay on resuming a hibernation session.
However, these limitations aside, hibernation is an often requested feature for Pop!_OS. The purpose of this article is to provide steps for enabling hibernation for any users that would like it. Since hibernation completely shuts off power to the device, it can prolong the lifetime of your battery. Additionally, there are some security benefits. Unlike suspend, the decryption key for the disk no longer remains in memory, and the disk is locked. This mitigates certain physical attacks that can extract the key from RAM.
Enable Hibernation on an Encrypted Drive
-
Boot into Pop!_OS Recovery
Turn your computer off, then turn it back on and hold down the
SPACEbar immediately. In the menu that appears, selectPopOS Recovery, and let it boot.Once it boots, close out of the installation window or choose
Try Demo Mode(be sure not to choose any install or repair options, as this could result in data loss. It will also mount the drive and make the next steps harder). -
Open
Gpartedby clickingActivities/Applicationsand searching for "Gparted" or by pressingSUPER+Tto open a Terminal, and running:gparted -
Disable and remove the SWAP partition. You can either right-click on the SWAP partition, and select
swapoffor issue that same command in the Terminal:sudo swapoffThen click on the swap partition, click the red
Xto mark it for deletion, and then press the green check-mark to approve the changes. -
Extend the
lukspartition to the end of the drive.Click on the encrypted
lukspartition and select the "Resize/Move" button. Use the GUI drag tools, or number fields, to make sure the OS partition extends to the end of the drive (afterEFIandrecovery). Use the green check-mark to apply the changes to the drive and closegpartedonce the changes are complete.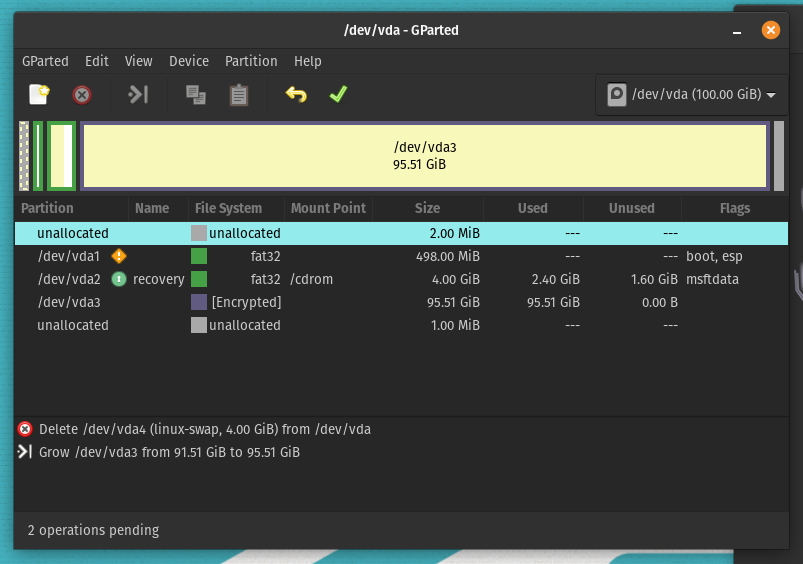
Open the encrypted partition using these Terminal commands:
SATA Drives NVMe Drives sudo cryptsetup luksOpen /dev/sda3 cryptdatasudo cryptsetup luksOpen /dev/nvme0n1p3 cryptdataNOTE: In the screenshot example, the partition is called
/dev/vda3. Adjust the drive name to your case (sda# or nvme#n#p#).sudo lvscan sudo vgchange -ay -
Reduce the size of the root volume by the size of main memory. If you have 16GB of memory, reduce the
data-rootvolume by 16GB. If you have 32GB, reduce by 32GB, etc. Use these Terminal commands:free -h sudo lvreduce -r -L -16G /dev/mapper/data-root -
Create a
swapvolume (instead of a drive partition):sudo lvcreate -L 16G --alloc contiguous --name swap data sudo mkswap /dev/data/swap -
Mount the
rootfilesystem and editcrypttabandfstabto update for the newswaplocation:Mount the
data-rootvolume:sudo mount /dev/mapper/data-root /mntEdit
crypttabto remove the original swap partition entry.sudo nano /mnt/etc/crypttab
Open
fstabto update the mount path for the new swap volume.# swap mount line will be changed to # /dev/mapper/data-swap none swap defaults 0 0 sudo nano /mnt/etc/fstab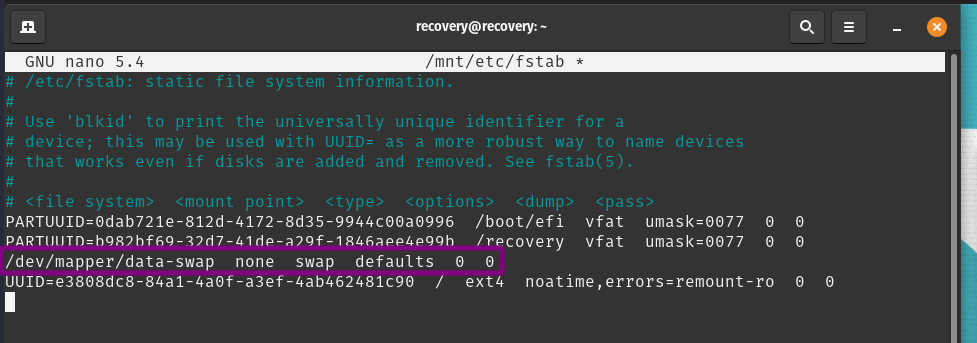
-
Reboot your computer and allow it to load Pop!_OS normally. Check that the swap partition in use and is sized for your system memory by running the following command in a terminal:
free -
Add a resume target for the kernel:
Using the UUID for the
data-swappartition run this command:sudo blkid # use the UUID for the /dev/mappter/data-swap line from the output of blkid sudo kernelstub -a "resume=UUID=xxxxxxxx-xxxx-xxxx-xxxxxxxx"NOTE: Replace everything after
UUID=with the ID of your newswapvolume.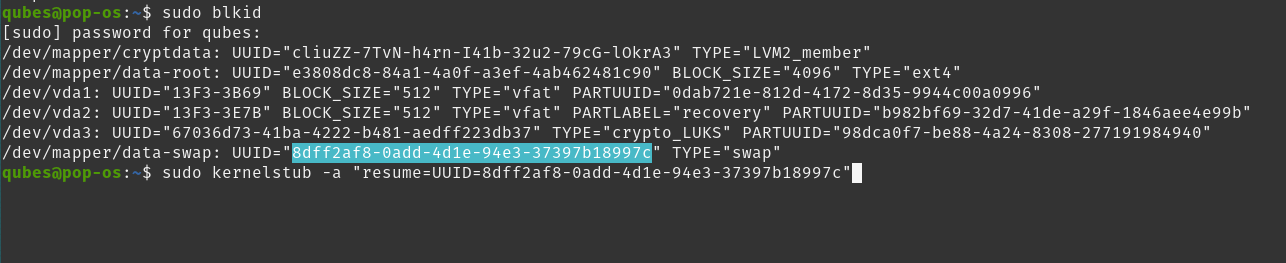
The system should now be ready to suspend to, and resume from disk.
You can test if hibernation works by booting back into your install and running:
sudo systemctl hibernateCAUTION: Hibernation, if used often, will add additional write traffic (equal to the total amount of RAM) to SSDs, shortening the lifespan of the drives.


Desktop Integration - GNOME Extension
-
Add Extension:
To add
HibernateandHybrid Sleepto the power menu, we'll need to add this GNOME-Shell extension: Hibernate Status Button -
Add
.pklafile:NOTE: Pop!OS and Ubuntu require a file at
/etc/polkit-1/localauthority/10-vendor.d/com.ubuntu.desktop.pklaTo create this file, run:
sudo nano /etc/polkit-1/localauthority/10-vendor.d/com.ubuntu.pklaThen copy these contents into the newly created file:
[Enable hibernate in upower]
Identity=unix-user:*
Action=org.freedesktop.upower.hibernate
ResultActive=yes

[Enable hibernate in logind]
Identity=unix-user:*
Action=org.freedesktop.login1.hibernate;org.freedesktop.login1.handle-hibernate-key;org.freedesktop.login1;org.freedesktop.login1.hibernate-multiple-sessions;org.freedesktop.login1.hibernate-ignore-inhibit
ResultActive=yes
Save (ctrl+s) and close the file (ctrl+x).
On your next boot, you should now have an Hibernate option in the top-right, drop-down, Power Off / Logout Options menu. The Hibernate option is located alongside the existing Suspend and Power Off options.