Support Articles
Windows (Install)
Important Disclaimer - Please Read
System76 is not a licensed reseller or installer of the Windows operating system. This article is provided for informational purposes only.
System76 encourages users to take ownership of their machines and install whatever software or operating systems they prefer. However, System76 does not guarantee the success or quality of experience when installing Windows and does not provide support or testing for any Windows version. Please do not open a support ticket for anything other than clarification of the steps covered in this article. The contents of this support article are the total extent of support and troubleshooting that System76 can provide for Windows. Any Windows-related support for System76 hardware not covered in this article is beyond the scope of support provided by System76. Please refer to Microsoft's official troubleshooting documentation or other online resources.
Installing Windows is undertaken at your own risk. It's possible not all hardware will function as intended and, drivers may not be available for all components. Your mileage may vary.
Windows 11
Windows 11 Compatibility: Windows 11 is not supported on all systems. Open Firmware systems below 13th Gen do not support Secure Boot which is a requirement for Windows 11. If your computer does not meet Windows 11 requirements, try Windows 10. Windows 10 is still supported by Microsoft until October of 2025.
Compatibility Table
| Laptop Model | Windows 10 Support | Windows 11 Support |
|---|---|---|
| Adder WS (addw1) | Yes | Yes |
| Adder WS (addw2) | Yes | No |
| Adder WS (addw3) | Yes | Yes |
| Adder WS (addw4) | Yes | Yes |
| Bonobo WS (bonw14) | Yes | No |
| Bonobo WS (bonw15) | Yes | Yes |
| Darter Pro (darp8 and older) | Yes | No |
| Darter Pro (darp9 and newer) | Yes | Yes |
| Galago Pro (galp6 and older) | Yes | No |
| Galago Pro (galp7 and newer) | Yes | Yes |
| Gazelle (gaze17 and older) | Yes | No |
| Gazelle (gaze18 and newer) | Yes | Yes |
| Lemur Pro (lemp11 and older) | Yes | No |
| Lemur Pro (lemp12 and newer) | Yes | Yes |
| Oryx Pro (oryp10 and older) | Yes | No |
| Oryx Pro (oryp11 and newer) | Yes | Yes |
| Pangolin (pang10 and newer) | Yes | Yes |
| Serval WS (serw12 and newer) | Yes | Yes |
| Desktop Model | Windows 10 Support | Windows 11 Support |
|---|---|---|
| Meerkat (meer5 and newer) | Yes | Yes |
| Thelio (thelio-r1 and newer) | Yes | Yes |
| Thelio (thelio-b1 and newer) | Yes | Yes |
| Thelio Mira (thelio-mira-r1 and newer) | Yes | Yes* |
| Thelio Mira (thelio-mira-b1 and newer) | Yes | Yes* |
| Thelio Major (thelio-major-r1 and newer) | Yes | Yes* |
| Thelio Major (thelio-major-b1 and newer) | Yes | Yes* |
| Thelio Mega (thelio-mega-r1 and newer) | Yes | Yes* |
| Thelio Massive (thelio-massive-b1 and newer) | Yes | Yes* |
| Thelio Spark (thelio-spark-b1-n2 and newer) | Yes | Yes* |
* For desktop computers you will want to confirm you have an 8th Gen Intel Core Processor or 2000 Ryzen AMD Processor, and that you have TPM enabled in the UEFI settings.
Planning the Installation
There are several ways to dual boot Pop!_OS and Windows. Make sure to follow the instructions for your specific situation:
- Installing in a Virtual Machine
- Installing on a Dedicated Drive (Recommended)
- Installing on a Shared Drive - Starting with Pop!_OS
Install Windows in a Virtual Machine
Understand Virtual Machines:
Virtual machines are a method of running multiple OSes on your computer simultaneously. It's conceptually a second computer that you control through a special application called a Hypervisor. You can install an additional operating system on this virtual computer, which you can then boot and run as if it were another system.
Setting up a Windows virtual machine (VM) allows running Windows on a virtual drive within the OS. The virtual machine can be started, stopped, and suspended without requiring the computer to be restarted, and you can run Windows and Pop!_OS applications simultaneously.
Virtual machines impose a slight performance penalty in their operation, depending on the exact application. Many applications will run near full-speed, but applications that depend on heavy computations or access to the GPU (like games and video editing software) will likely be faster with a dual boot.
Enable AMD-V
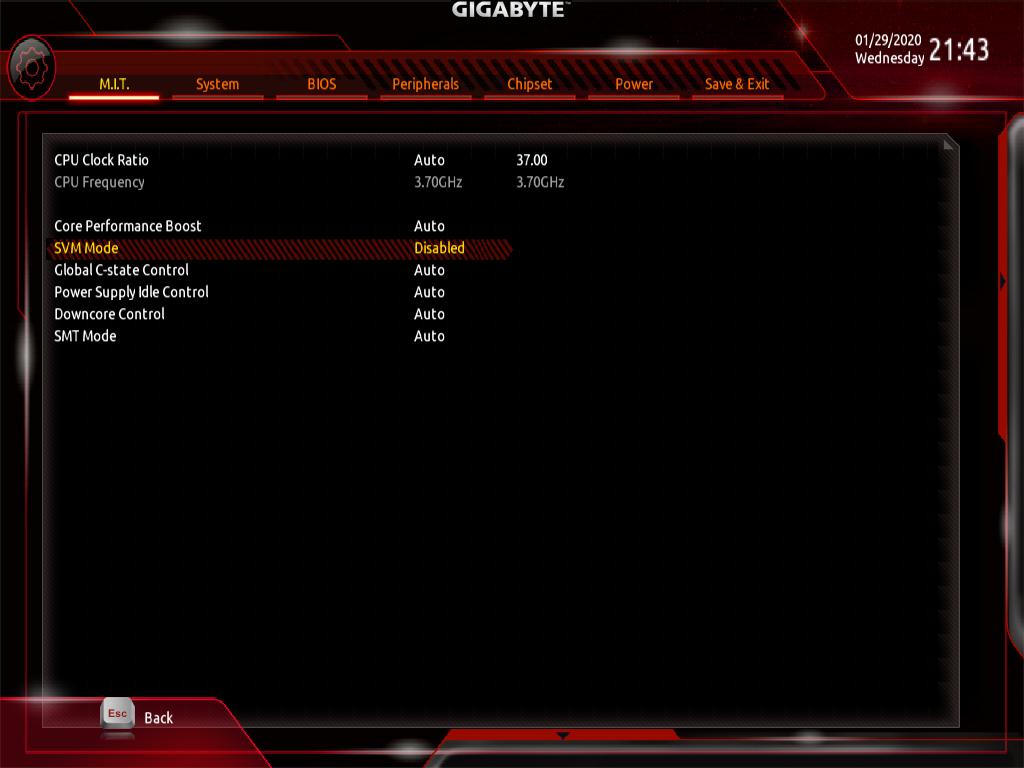
On some models, for example, Thelio (thelio-r1) and Thelio Major (thelio-major-r1), you will need to enable AMD-V in the BIOS by rebooting and holding the Del key. Then enable SVM mode with the following path:
M.I.T tab -> Advanced Frequency Settings -> Advanced CPU Core Settings -> SVM mode -> Enabled.
Install VirtualBox
To act as your hypervisor, we recommend installing VirtualBox, since it's free and easy to use. VirtualBox is available from Oracle's website here or in the Pop!_Shop.
Open the Pop!_Shop, then enter "virtualbox" in the search field. Click on the VirtualBox result with the blue icon. You should see the window below:
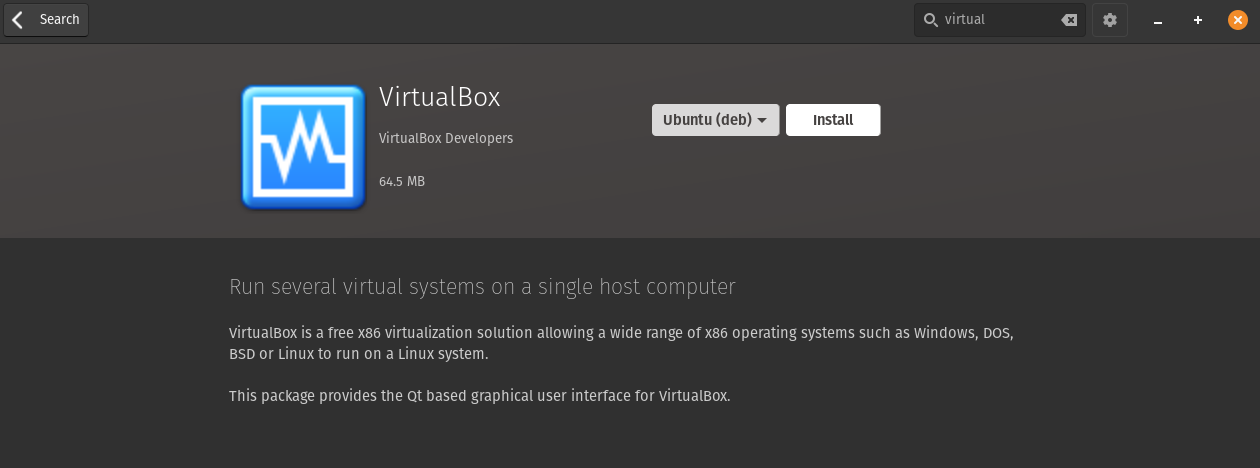
Click the Install button, then wait for the download and install process to complete.
Create Virtual Machine
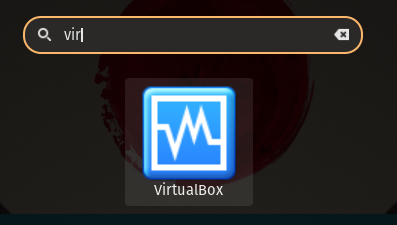
Once you have VirtualBox installed, we'll need to create the virtual computer upon which we'll install Windows later. Press the SUPER Key on your keyboard and then enter "virtualbox" in the search field.
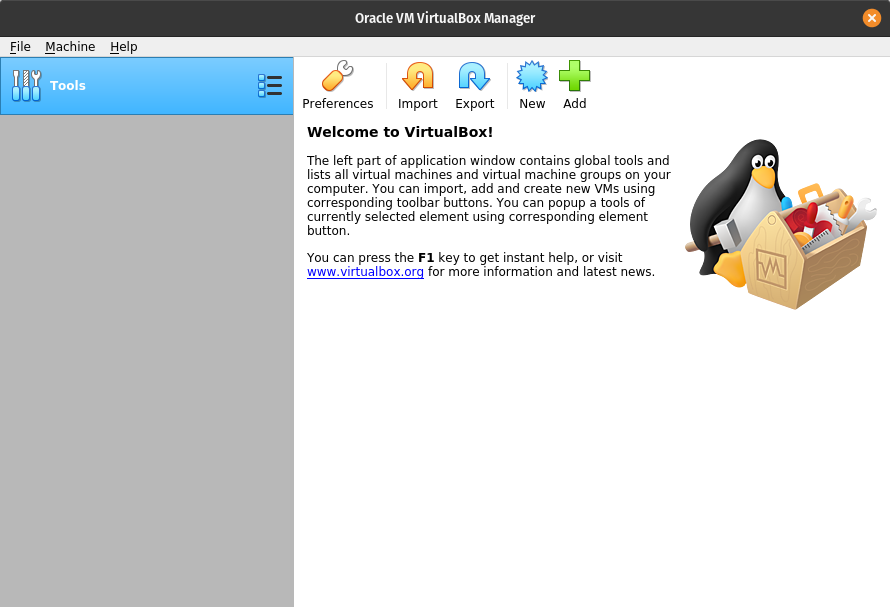
Click on the New button in the toolbar, then give your machine a name. If it isn't already filled out, set the machine "Type" to Microsoft Windows and the "Version" to Windows 10 64-bit, and click Next.
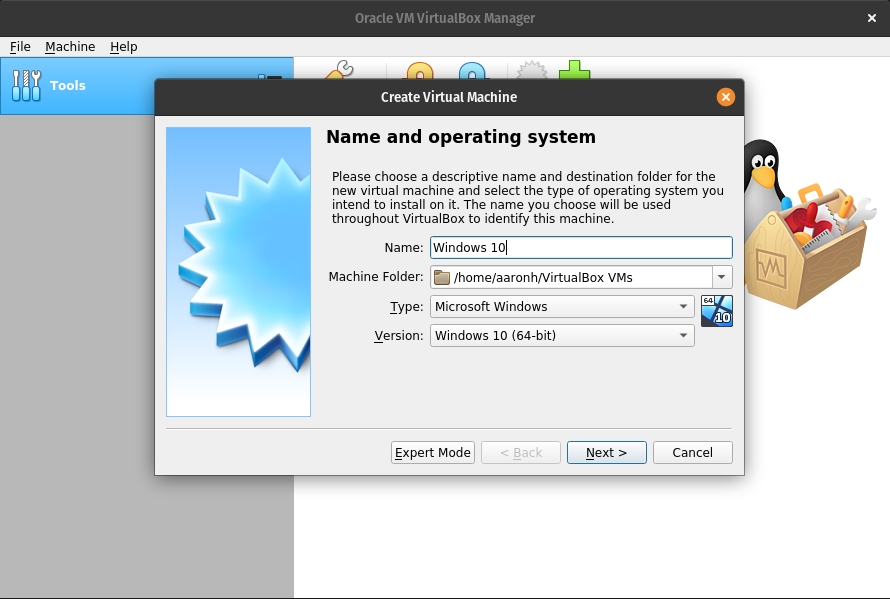
Increase the virtual machine memory size to half of the total RAM available. For the Hard Drive, you'll want to choose to Create a virtual hard drive now.
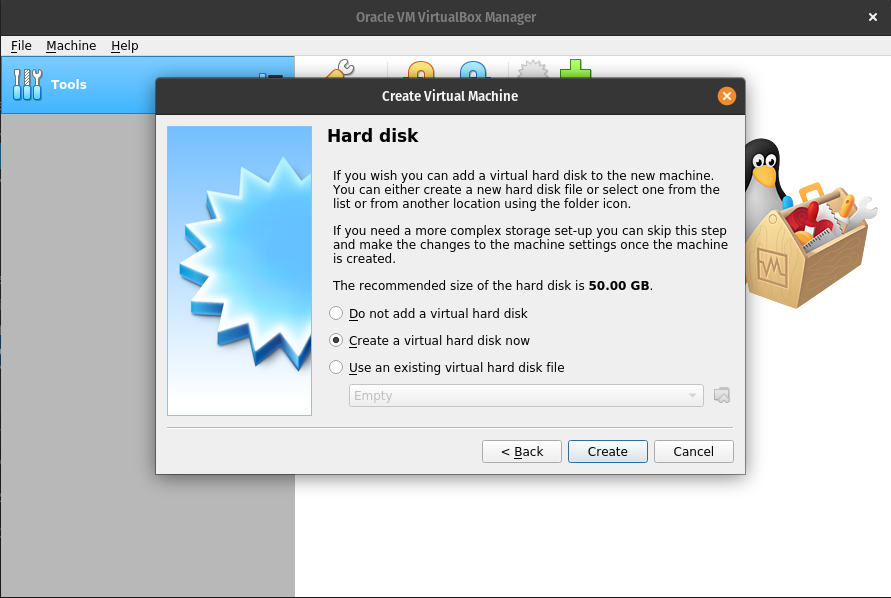
For the options in creating the virtual hard drive, create a VHD (Virtual Hard Disk), Fixed size, 16 GB or larger.
Install Windows
Once you've created the new VM, you should see it listed in the VirtualBox window:
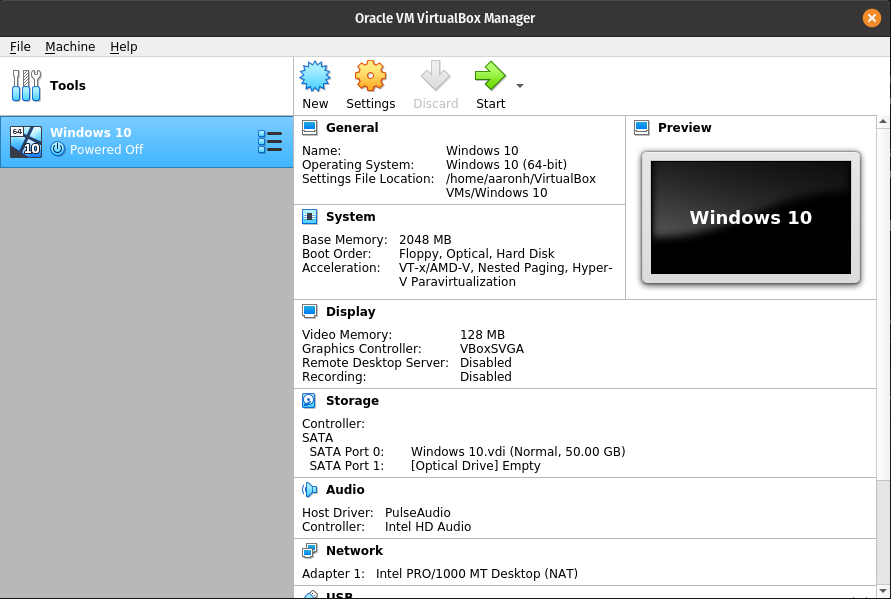
The next step is to boot the virtual machine and install an OS on it. Click on the VM in the list so that it is highlighted orange, then click the Start button. This is equivalent to pressing the power button on the virtual computer.
VirtualBox will now ask you to select a start-up disk. Click the small folder icon next to the dropdown, then point VirtualBox at your ISO file and open it. VirtualBox will then boot the file.
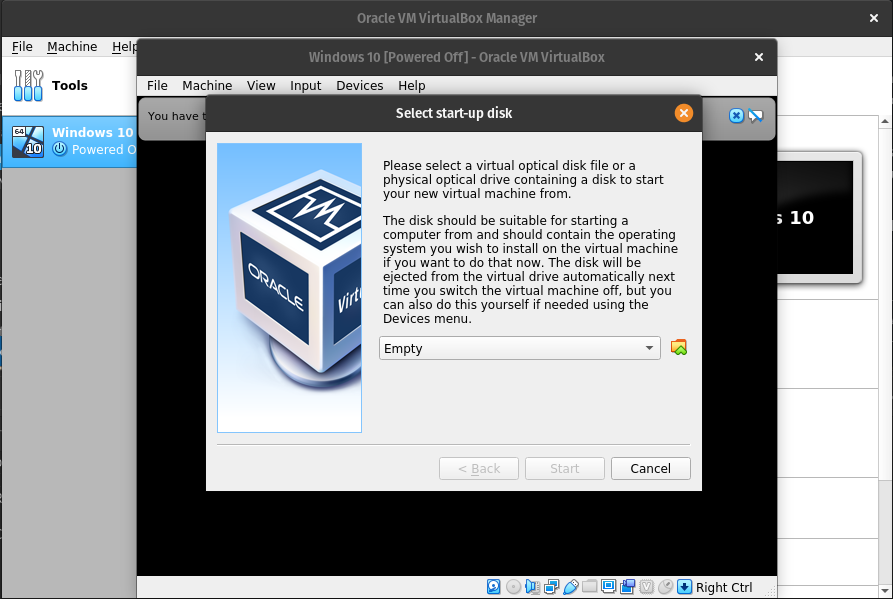
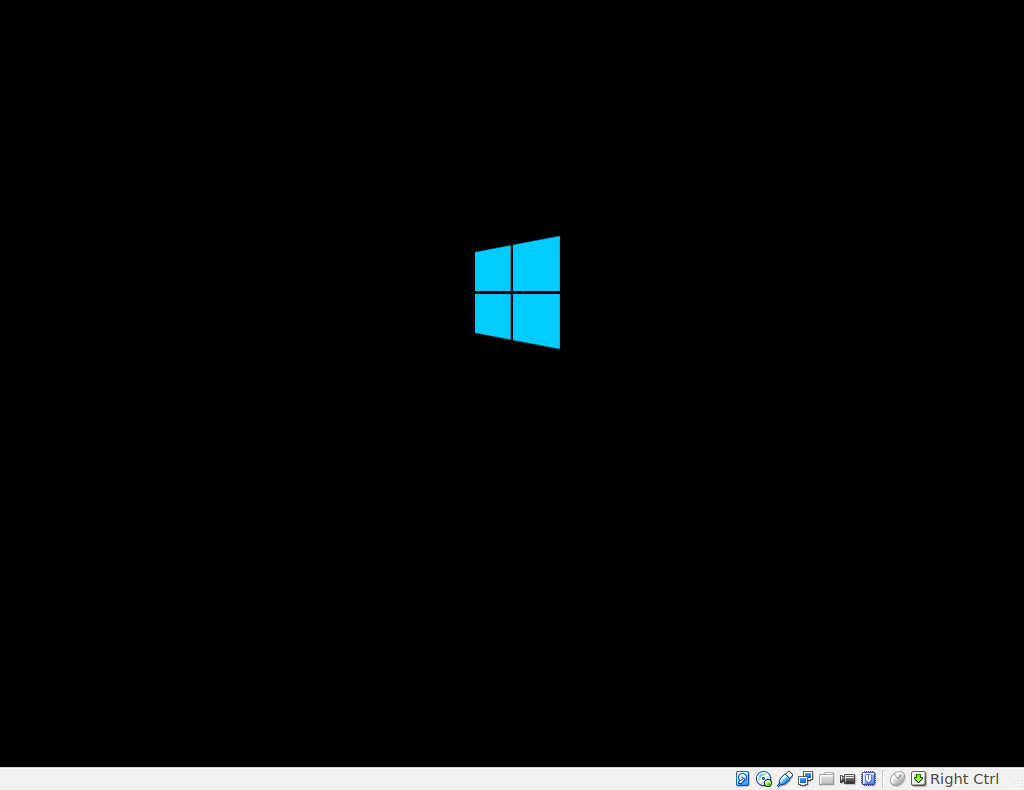
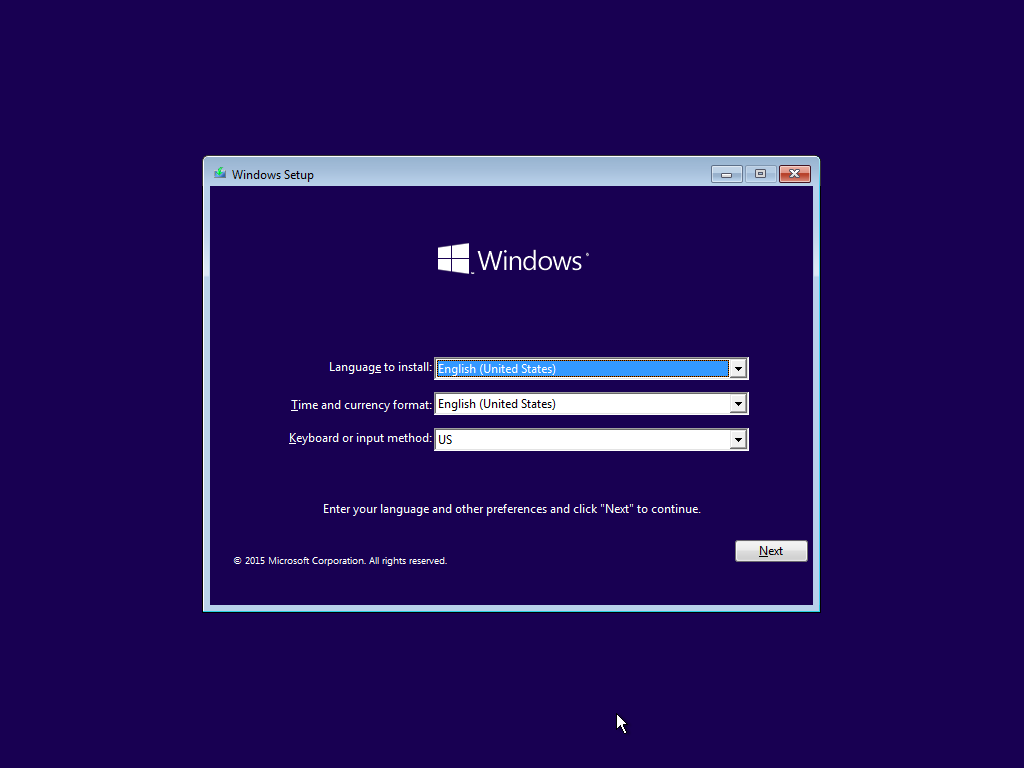
After Windows finishes booting from the ISO, you should see the Windows Setup window. Select your desired options for "Language to install," "Time and currency format," and "Keyboard or input method," then click Next.
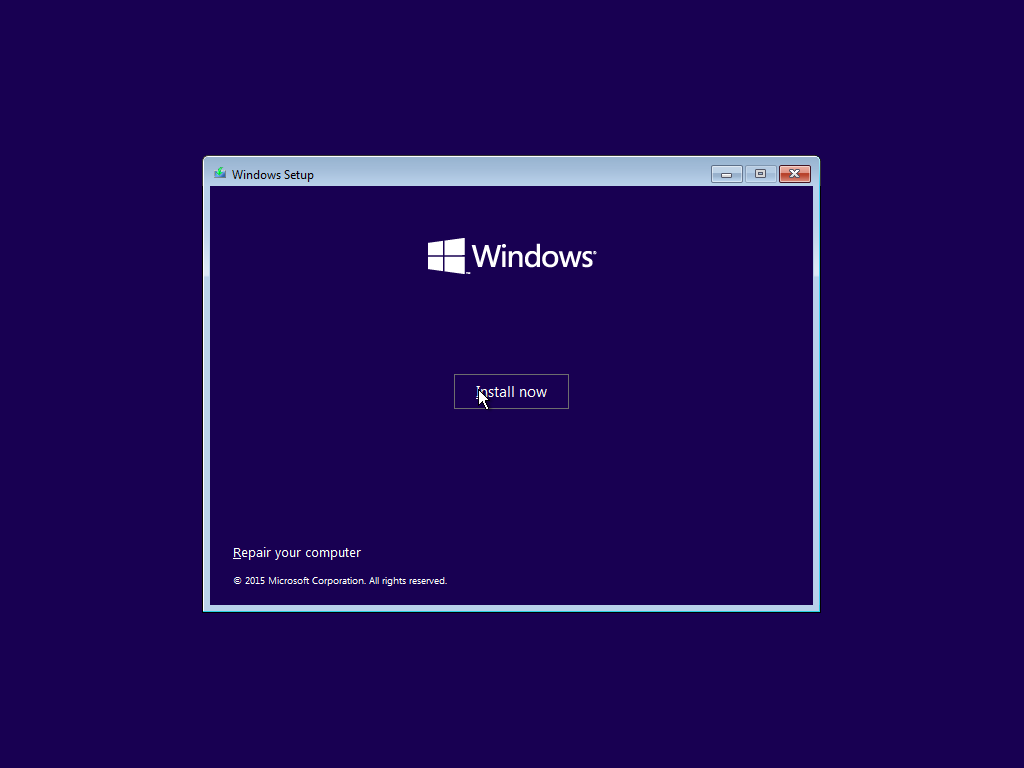
On the next screen, click Install Now to start the installation.
To install Windows on your System 76 computer, we will need to create a Windows USB installer. Creating a Windows installer on Linux is similar to how you create Linux USB installers. However, the Windows installer has unique set up requirements, so not all USB creation tools will work.
Create a Windows USB Installer
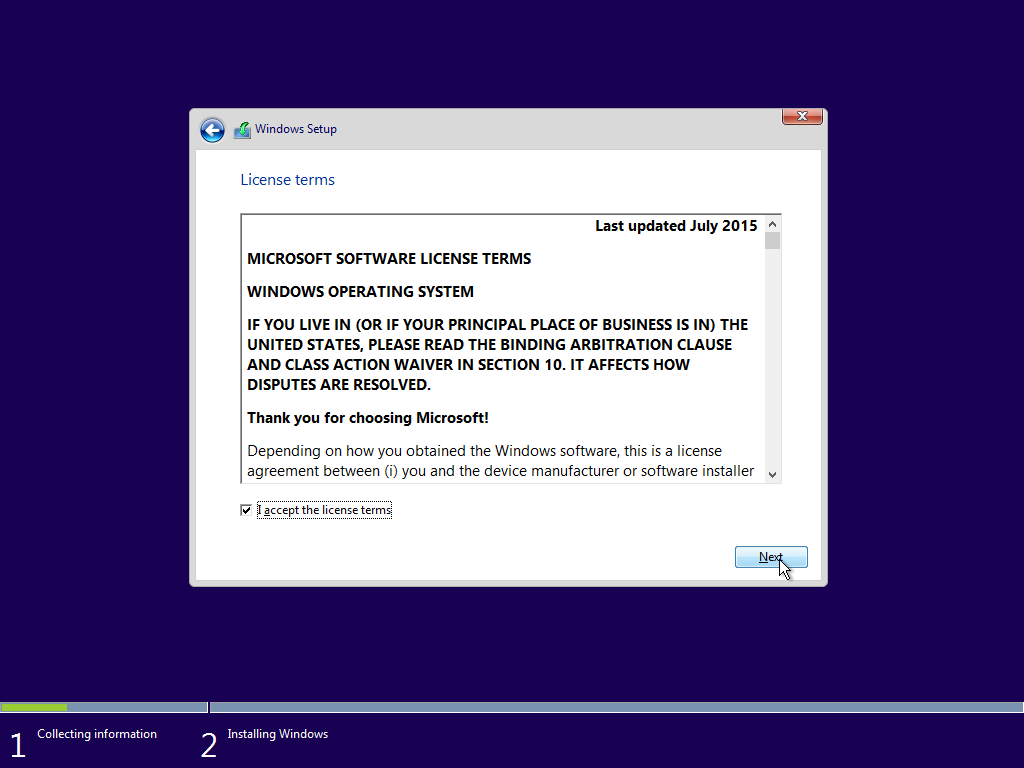
Review the terms of the EULA. You are required to accept the terms of the EULA before completing the installation. Checking the box and clicking Next assumes you do accept the terms and agree to be bound by them. Do not continue with the installation if you don't agree to the terms in the EULA.
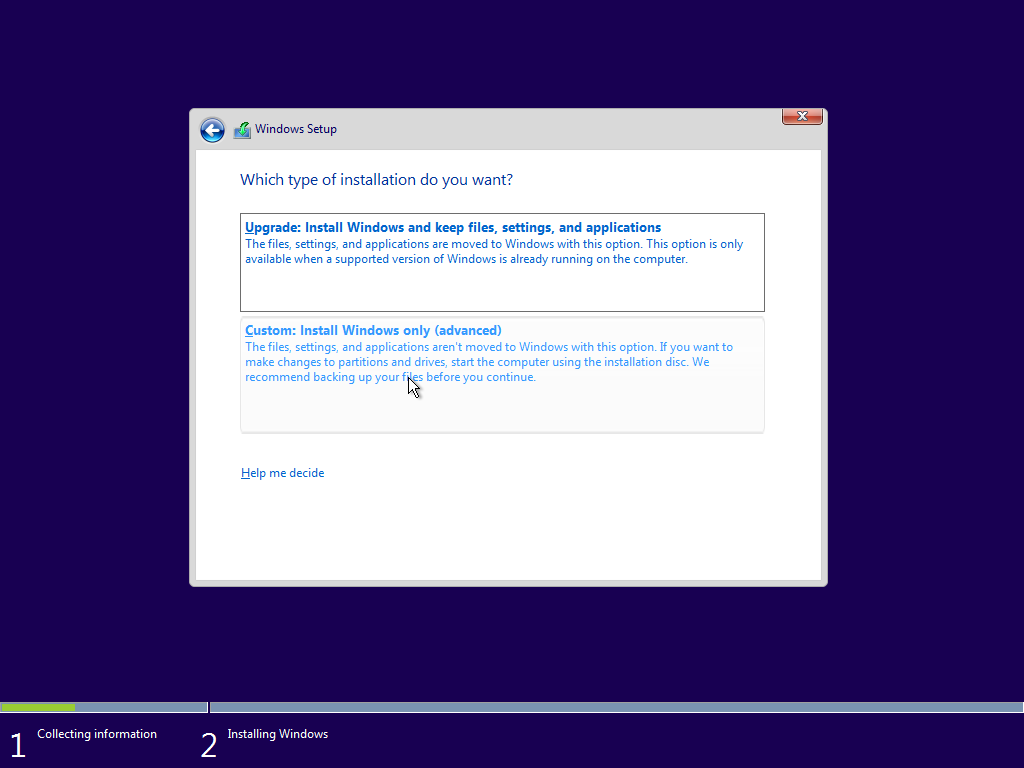
Make sure you select Custom: Install Windows only (advanced), as this is a new installation of Windows.
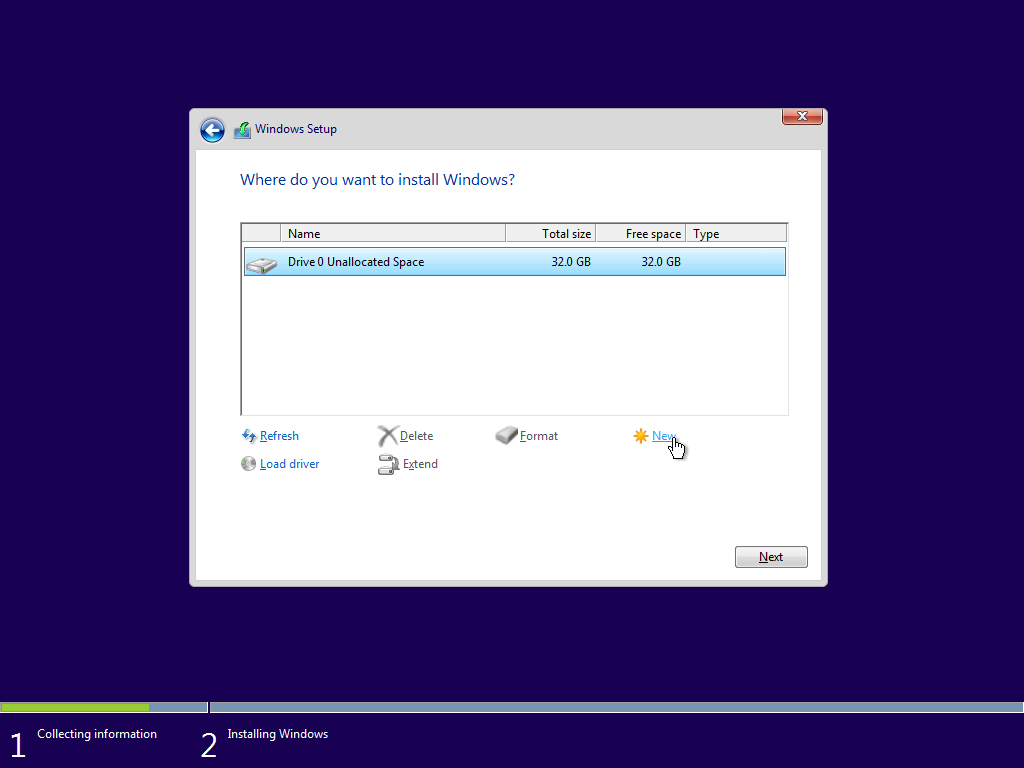
Select the Drive 0 Unallocated Space area, then click Next.
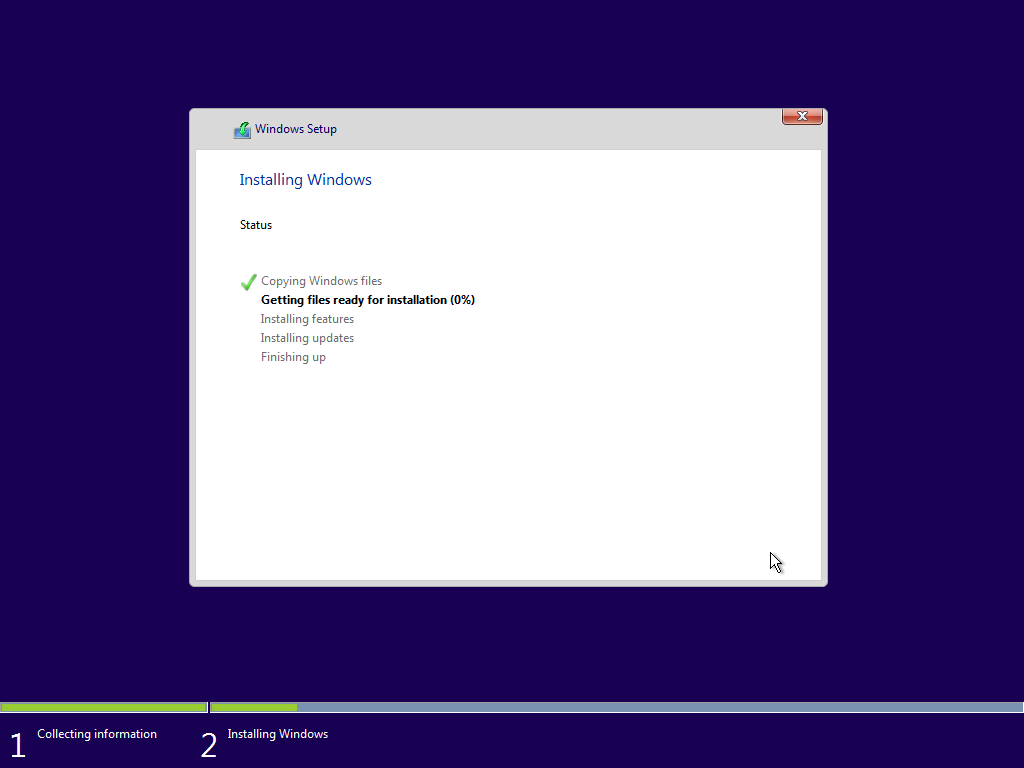
Windows will next begin copying over the installation files onto the virtual hard disk. This step may take a while, so feel free to work in the background while it's running. The virtual machine will automatically reboot when it's time to continue.
When the VM reboots, you may be prompted to "Press any key to boot from CD or DVD..." (pictured below). Do not press any keys here, or the installation will start over.
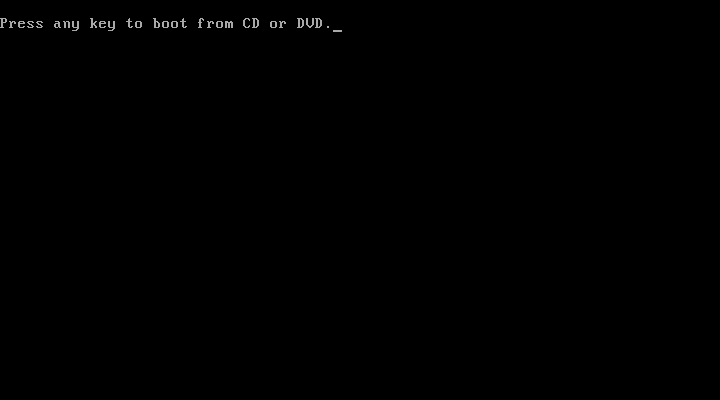
Windows will now finish installing files and get the system ready to be set up. The virtual machine may reboot again. Remember do not press any keys to boot from the CD or DVD.
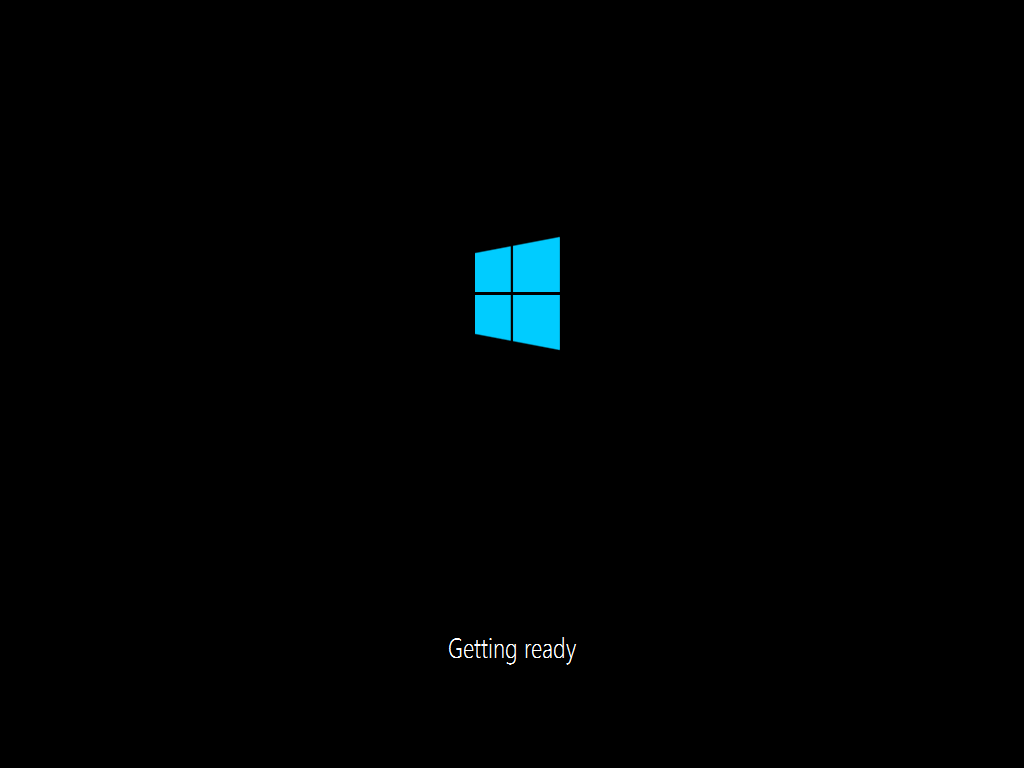
After the process is finalized, you can begin the setup process.
Set Up Windows
Setup will begin with the following screen:
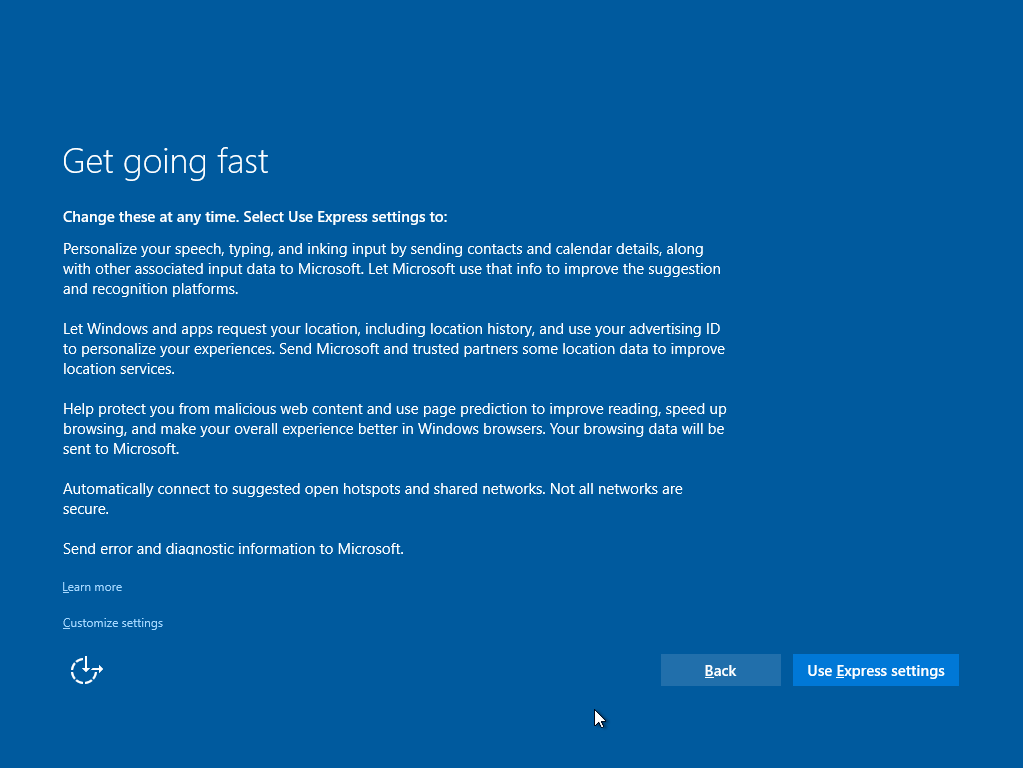
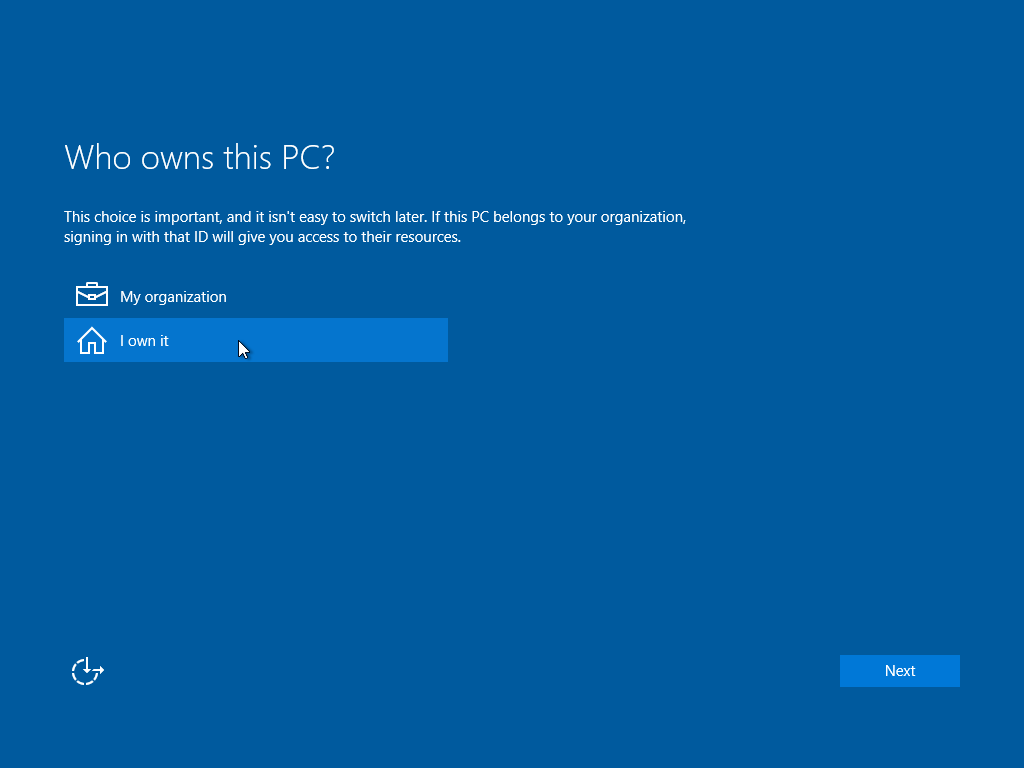
You may select either "Use express settings," or you can customize the settings to suit your preferences. Next, Windows will download updates to ensure you're on the latest version of the OS. This step may take a while, depending on your Internet connection. When it's finished, Windows will ask you who owns this PC. Select I own it, unless you're setting the VM up for someone else. Click Next.
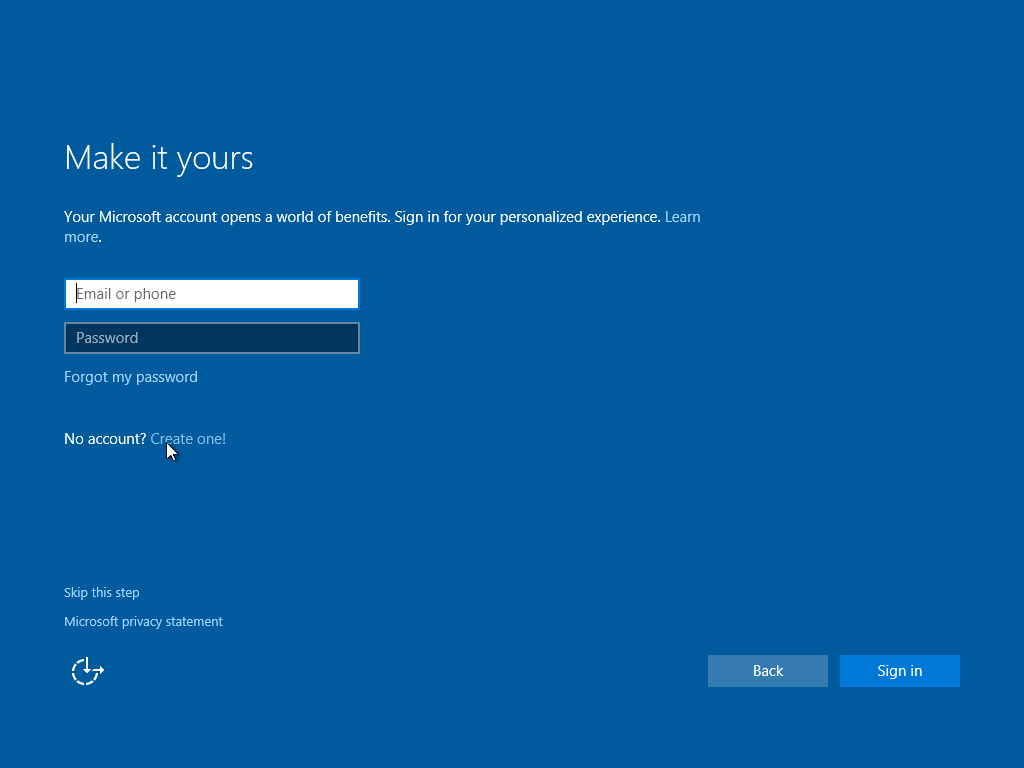
Next, you'll be prompted to sign in with your Microsoft account. This step is recommended as it can allow for resetting your password remotely if you forget it. It can also sync your settings, apps, and files to other Window's PCs. If you don't have a Microsoft account, you can create one with the supplied link.
If you prefer to use a local account, you can skip this step.
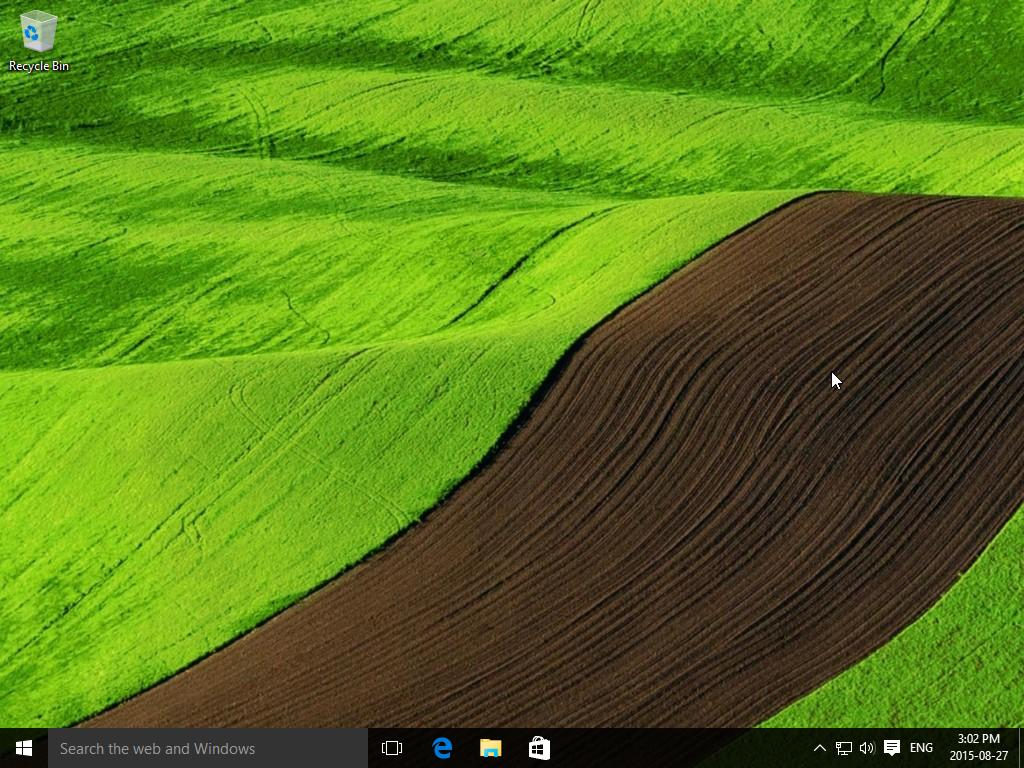
Windows 10 allows you to set a PIN for logging in instead of a password. If you'd like to set a PIN, you can do so now, or skip this step. After completing the rest of your setup to your preferences, your desktop will load, and you'll be able to log in using the PIN or password. You'll then be presented with the desktop.
Use the Windows Virtual Machine
The virtual machine will be presented through a window, and can be interacted with similarly to any other application.
NOTE: the virtual machine window will capture the keyboard input (The mouse is automatically captured or released depending on whether it's currently on top of the virtual machine window or not). If the input is currently captured, and you need to send input to the desktop (or a window outside of your virtual machine window), you'll need to tap the Right-hand
CTRLfirst, which will release the keyboard from the Virtual machine, and allow it to work in the desktop again. Clicking inside of the Virtual Machine window will re-enable the keyboard capture.
Add Network Printer
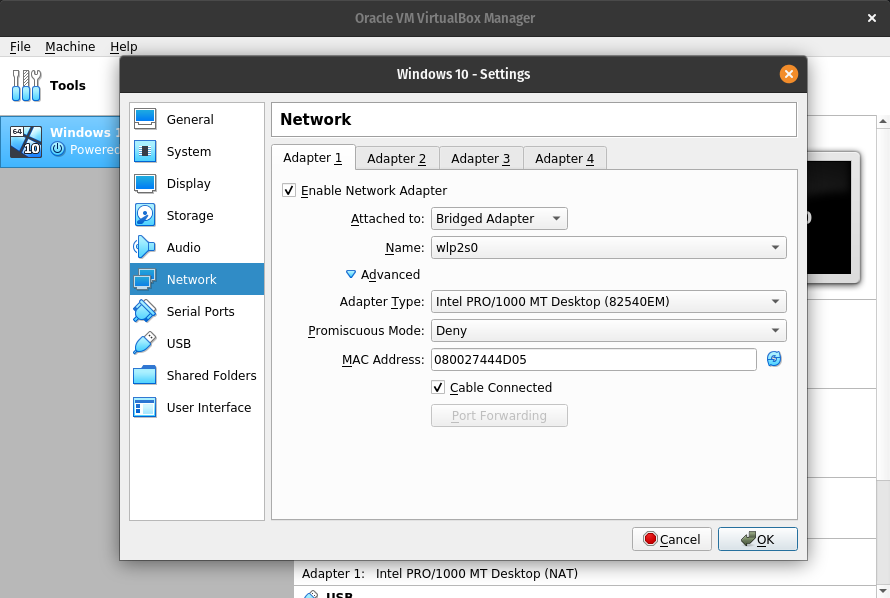
In VirtualBox, click your virtual machine so it's highlighted in orange. Select Settings in the top menu. Select Network and make sure the "Enable Network Adapter" is checked and the "Attached to" option is Bridged Adapter. The network name (SSID) is the name of the network you wish to connect to.
Select OK and power on your virtual machine. Go to the Printer menu and select the option to Add a Printer. Windows should automatically find your printer. Select it and follow the prompts to finish the installation. Print a test page to confirm the connection worked.
Dual-Booting Windows
Creating Install Media
Download the latest Windows .iso file from Microsoft's website. Plug in a USB flash drive (8GB or larger) to use as an installation disk. The USB drive will be wiped during this process.
On Pop!_OS or Ubuntu, install WoeUSB-ng using these commands:
sudo apt install git p7zip-full python3-pip python3-wxgtk4.0 grub2-common
sudo pip3 install WoeUSB-ng
Once installed, open the WoeUSB-ng application and create the USB installer with the steps below:
-
Select the Windows .iso file as the source.
- Select
Other Locations->Computer->home->your-username->Downloads.
- Select
-
Select the USB flash drive as the target device.
-
Click
Install.
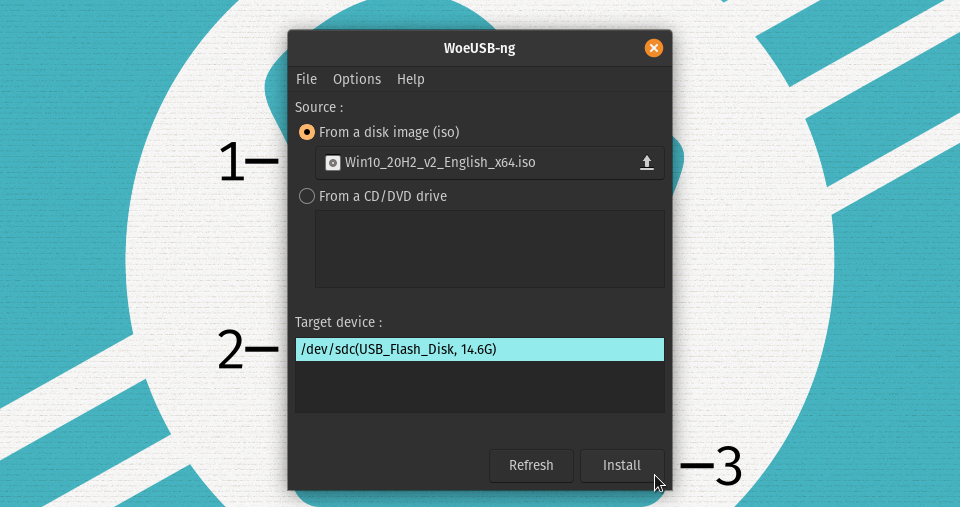
It may take several minutes or more for the process to finish -- wait until the Installation succeeded! message appears.
Installing on a Dedicated Drive
The easiest way to dual-boot Windows is to install it on a separate physical drive from Pop!_OS. This allows both Windows and Pop!_OS to use their default partition schemes, and allows you to select the OS using the UEFI firmware menu.
NOTE: If you want to use full-disk encryption in Pop!_OS, this is the only option.
For the safest experience, power off your machine, open the case, and remove the drive with Pop!_OS prior to installing Windows. This ensures Windows won't overwrite the Pop!_OS bootloader, and helps avoid accidentally overwriting Pop!_OS.
Install Windows
Plug the USB installer into your machine, then power on while holding the appropriate key to enter the boot menu:
Escfor laptops with Open FirmwareF7for laptops with proprietary firmwareF8orF12for Thelio desktopsF10for Meerkat desktops
From the boot menu, select the drive containing the Windows ISO.
Performing the Installation
Select your language, region, and keyboard settings, then click Next.
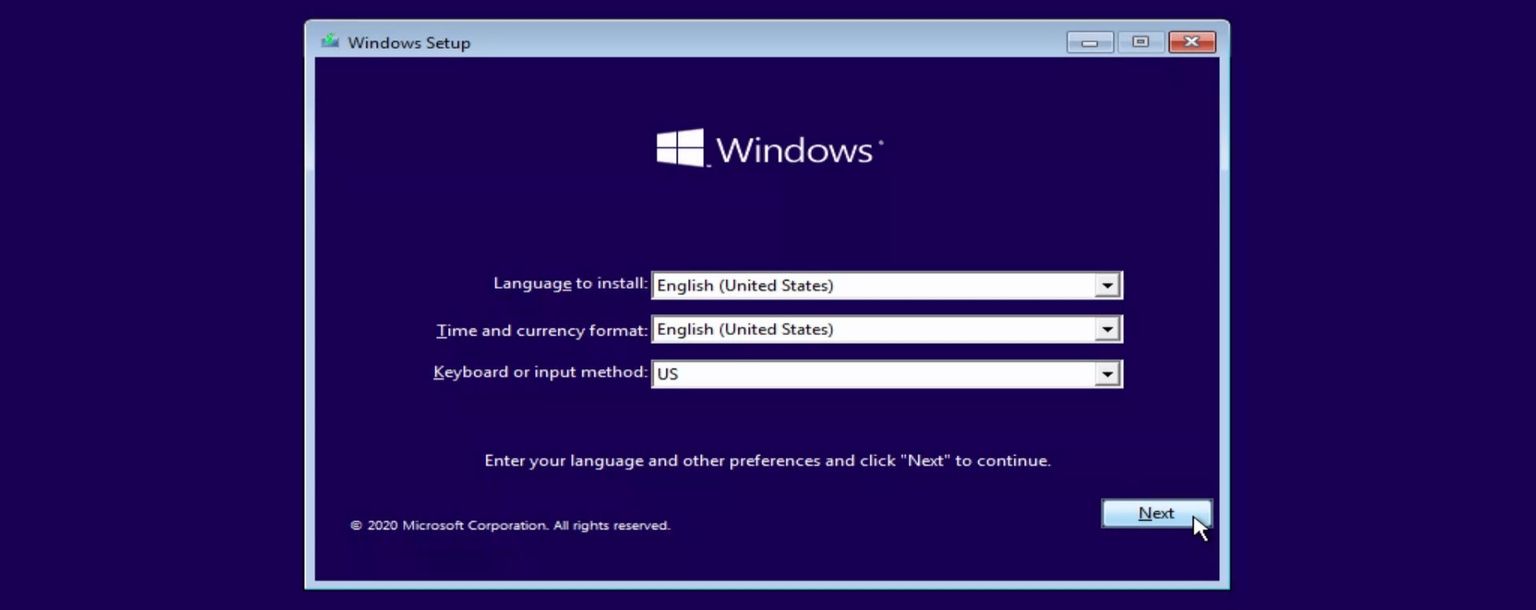
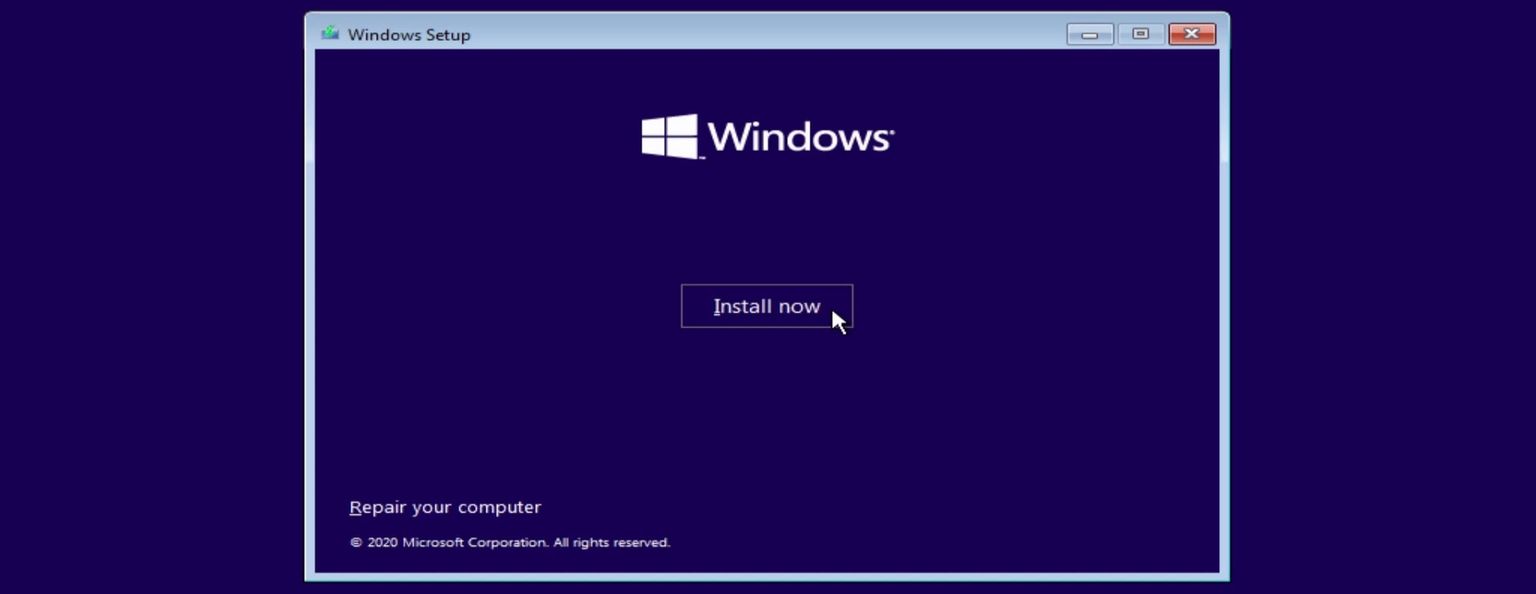
On the next page, click Install now.
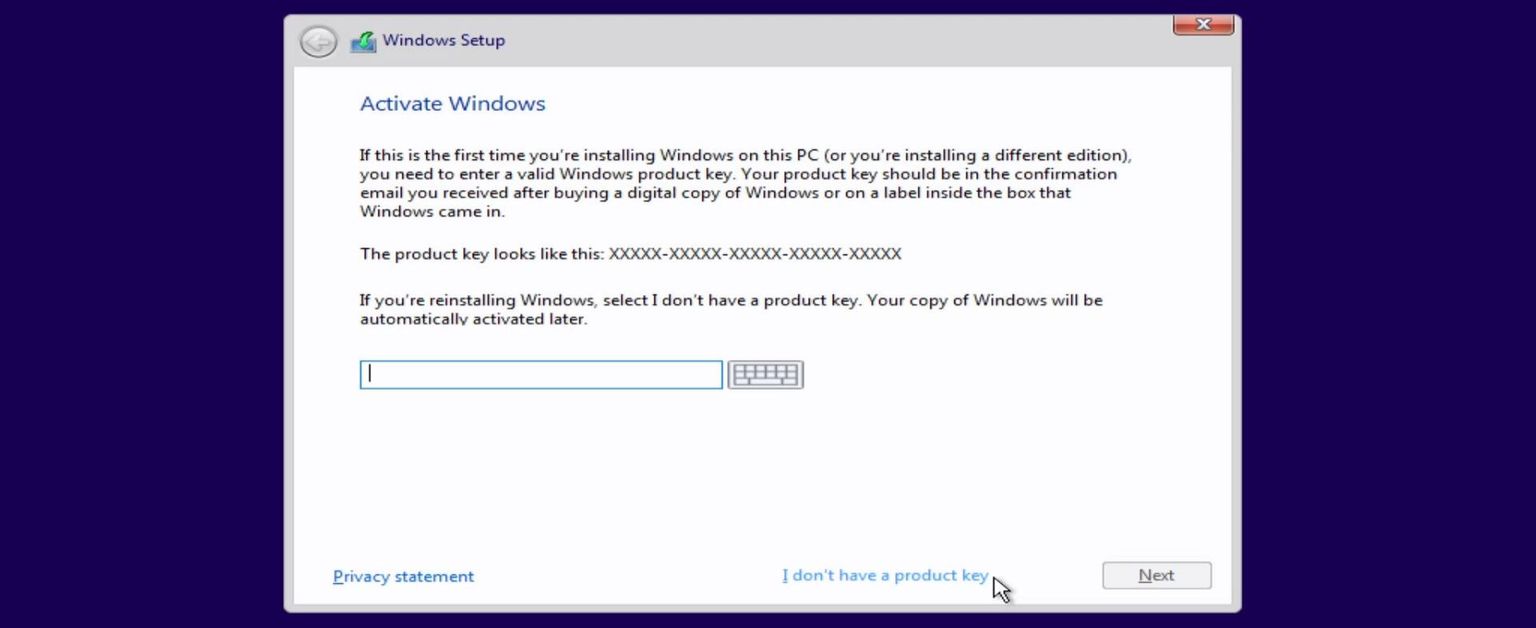
On the Activate Windows page, enter your Windows product key, then click Next. If you don't have a product key, click I don't have a product key. (Usage of Windows without a product key may violate Microsoft's license terms for Windows, and some features may be limited or unavailable.)
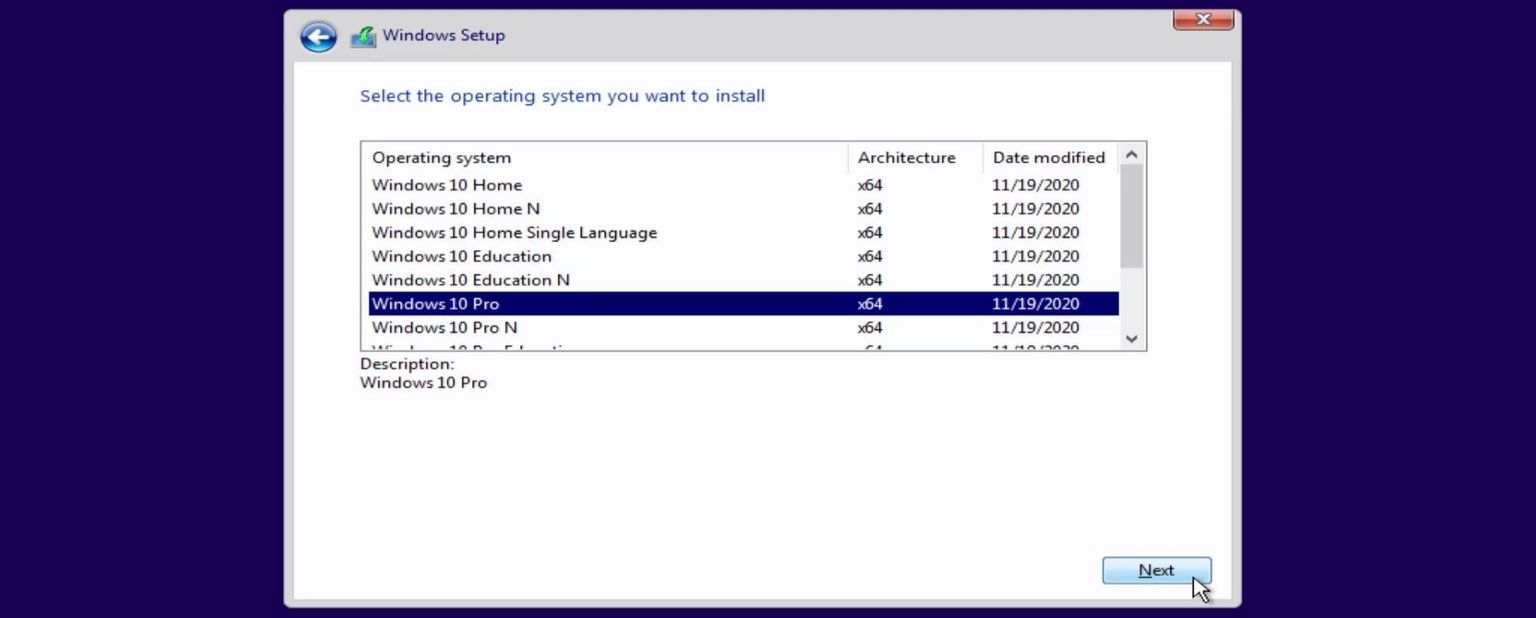
If you didn't enter a product key, you will be asked to choose which version of Windows to install. The standard version for desktop and laptop computers is Windows 10 Pro (if you're not sure which version to select, use this one.)
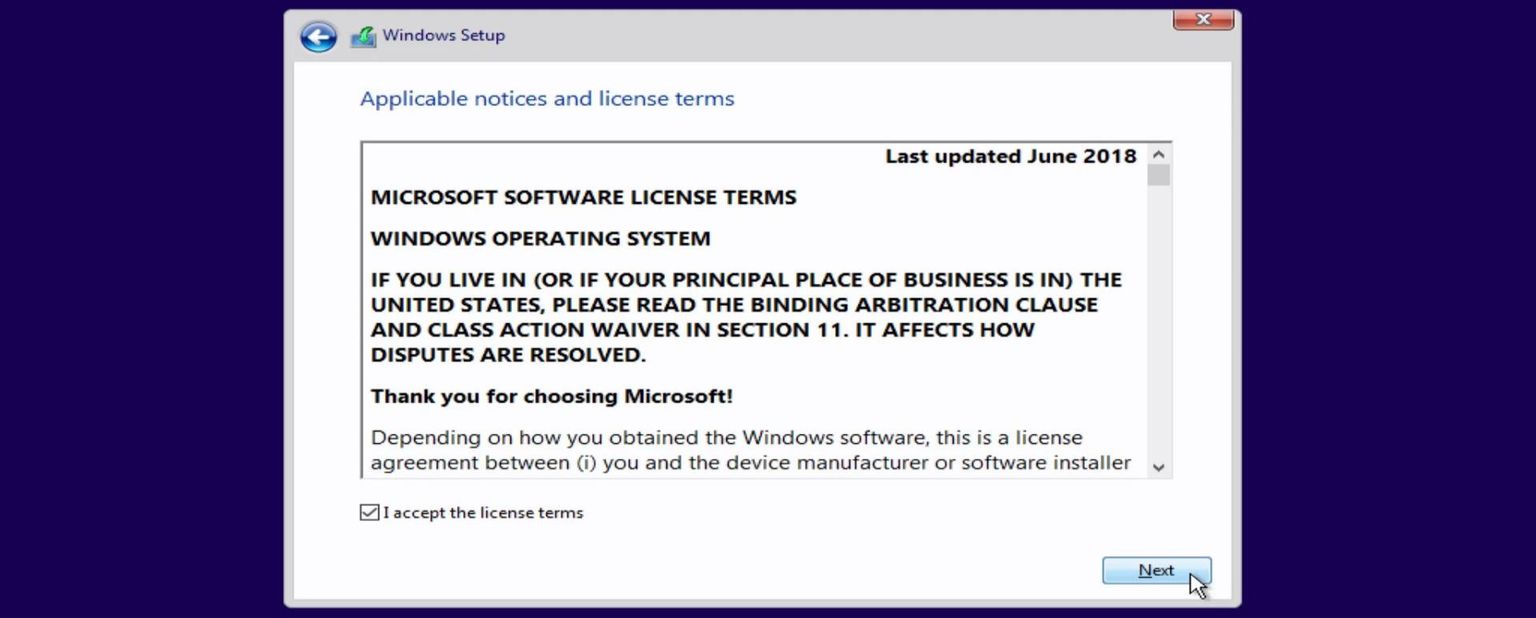
Next, you will be asked to read and accept Microsoft's license terms for Windows. To continue, check the I accept the license terms checkbox and click Next.
The next page will ask what type of installation you want to perform. Since there is no existing Windows installation to upgrade, select the Custom: Install Windows only (advanced) option.

Finally, the installer will ask you to select where you want to install to. In this scenario, we are installing Windows to a dedicated drive (if you're doing something else, see Planning the Installation).
If the drive to be used for Windows already contains any partitions, start by deleting those partitions. To do this, you'll need to identify which drive will be used for Windows.
For example, if you purchased a System76 machine with multiple drives, any extra drives should have a single partition (while the OS drive for Pop!_OS will have three or four partitions.) In this example, the Pop!_OS drive is 256GB and the Windows drive is 128GB, so we'll delete the single partition on Drive 1 because it's closest to 128GB:
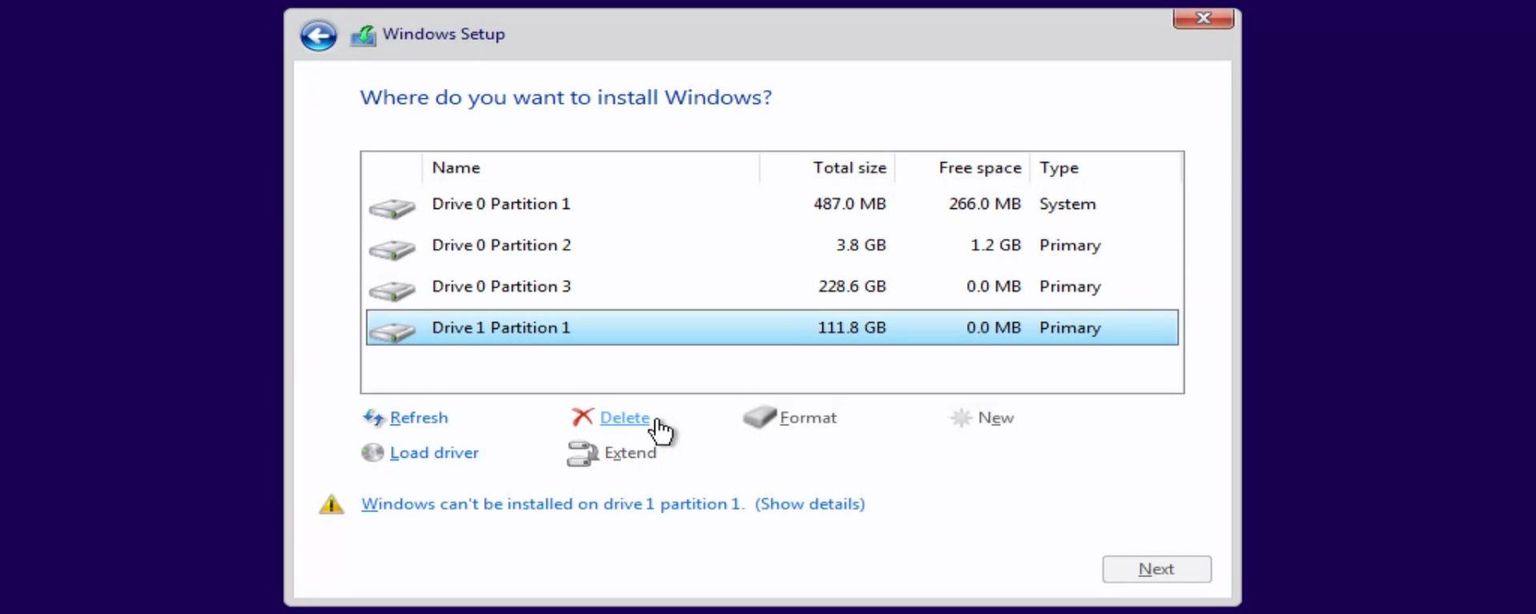
(If your flash drive is large enough, it may also show up in the list of drives; once again, identify it by its size and do not attempt to delete its partitions, since it's where the installer is stored.)
You will be asked to confirm any partitions you delete:

Once all of the partitions have been deleted from the soon-to-be Windows drive, select the Unallocated Space on that drive and click Next. This will allow the installer to configure the necessary partitions automatically.
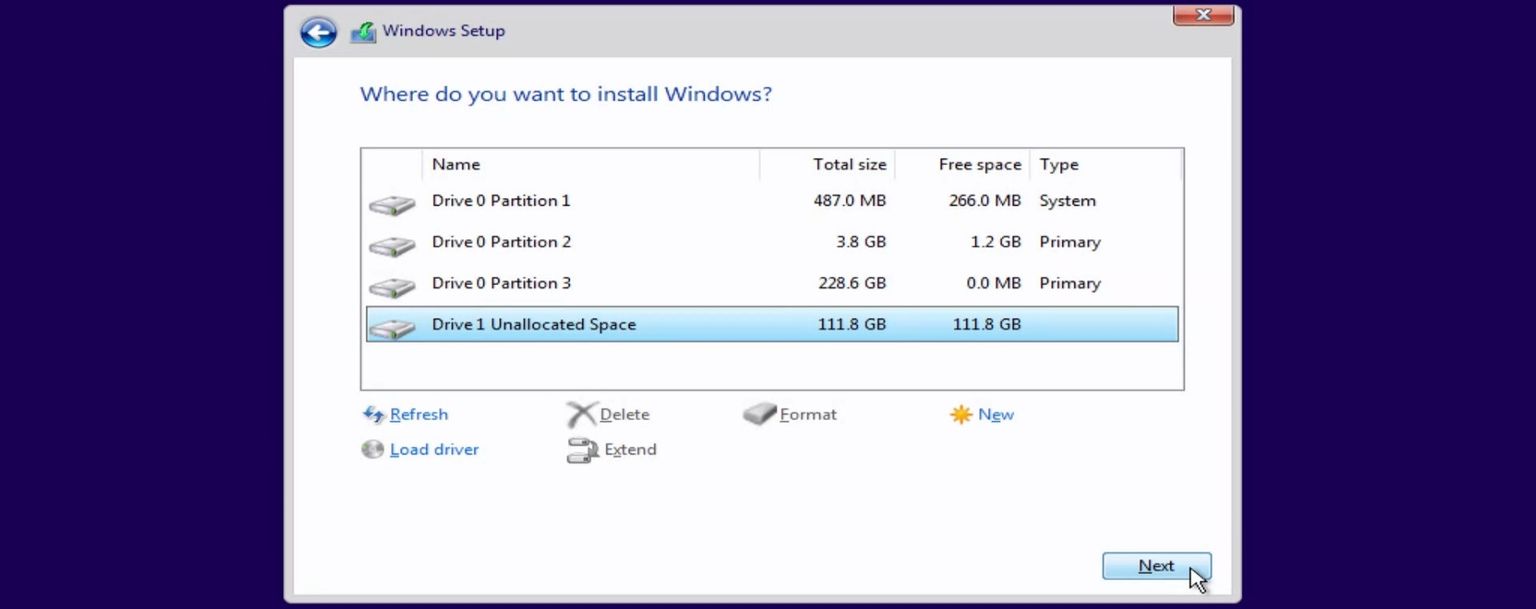
Next, wait for the Windows installation to complete. The installer will show progress as it copies and expands the OS files. The system may reboot one or more times.

If you see a message about checking the disk, wait and allow the installer to check its newly-created partitions.

Eventually, the Windows out-of-box experience wizard will start. Select your country (it may be automatically selected if you're connected to the internet) and click Yes.
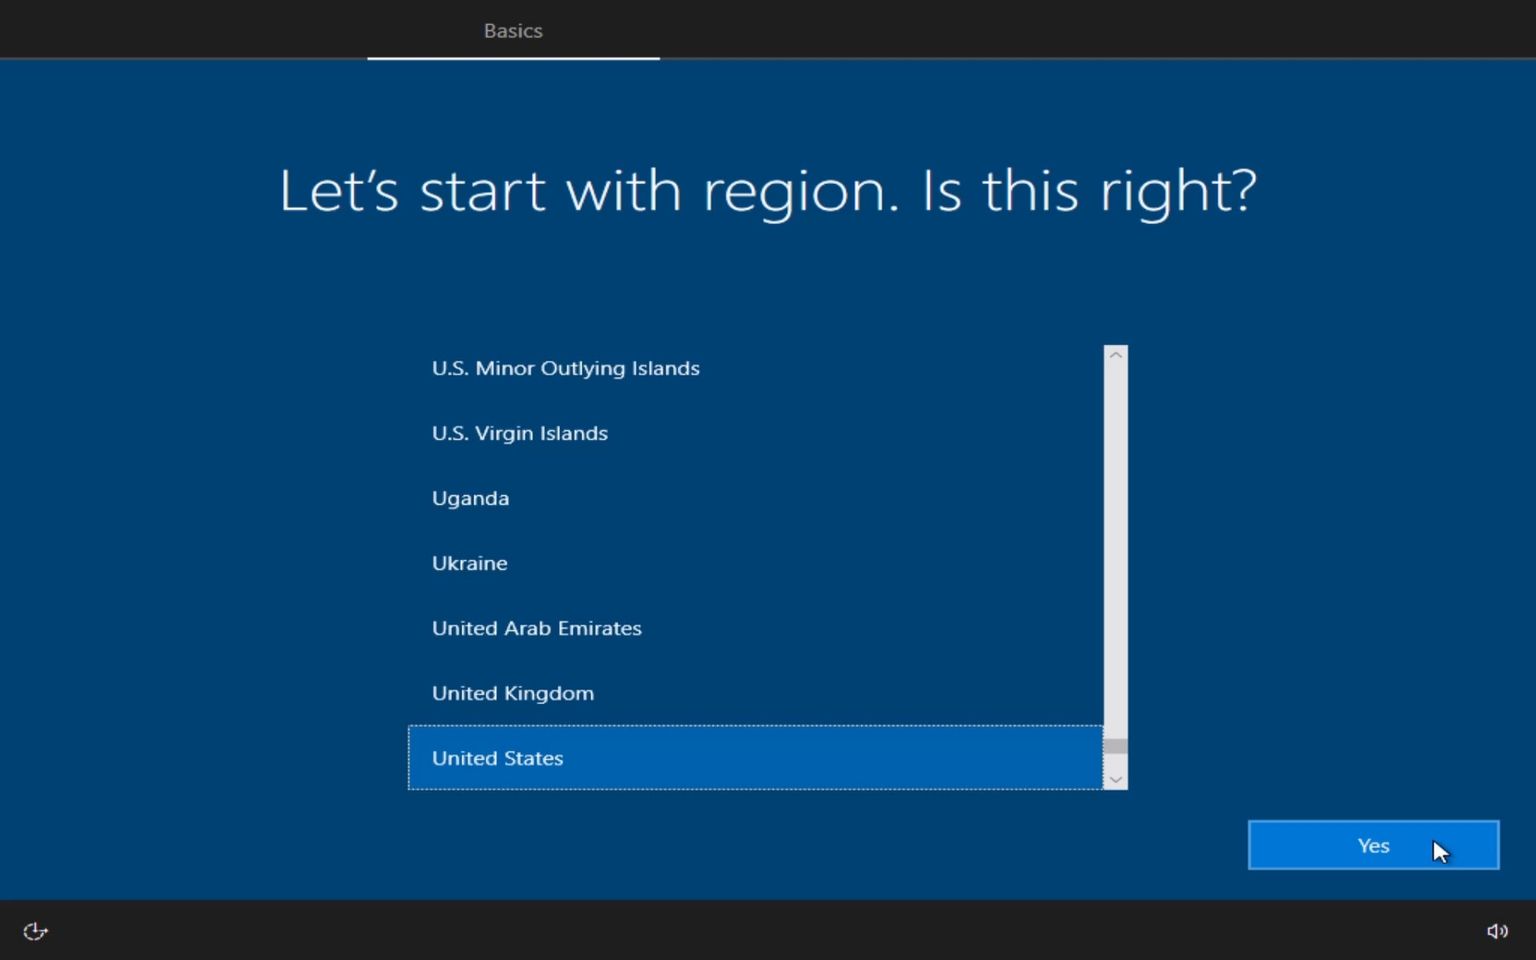
Follow the wizard to select your preferences:
- Keyboard layout
- Network setup, if using WiFi
- Account details
- Privacy settings
- Cortana settings
After completing the wizard, Windows will display a slideshow while it finishes setting up. Eventually, you will see the Windows desktop:
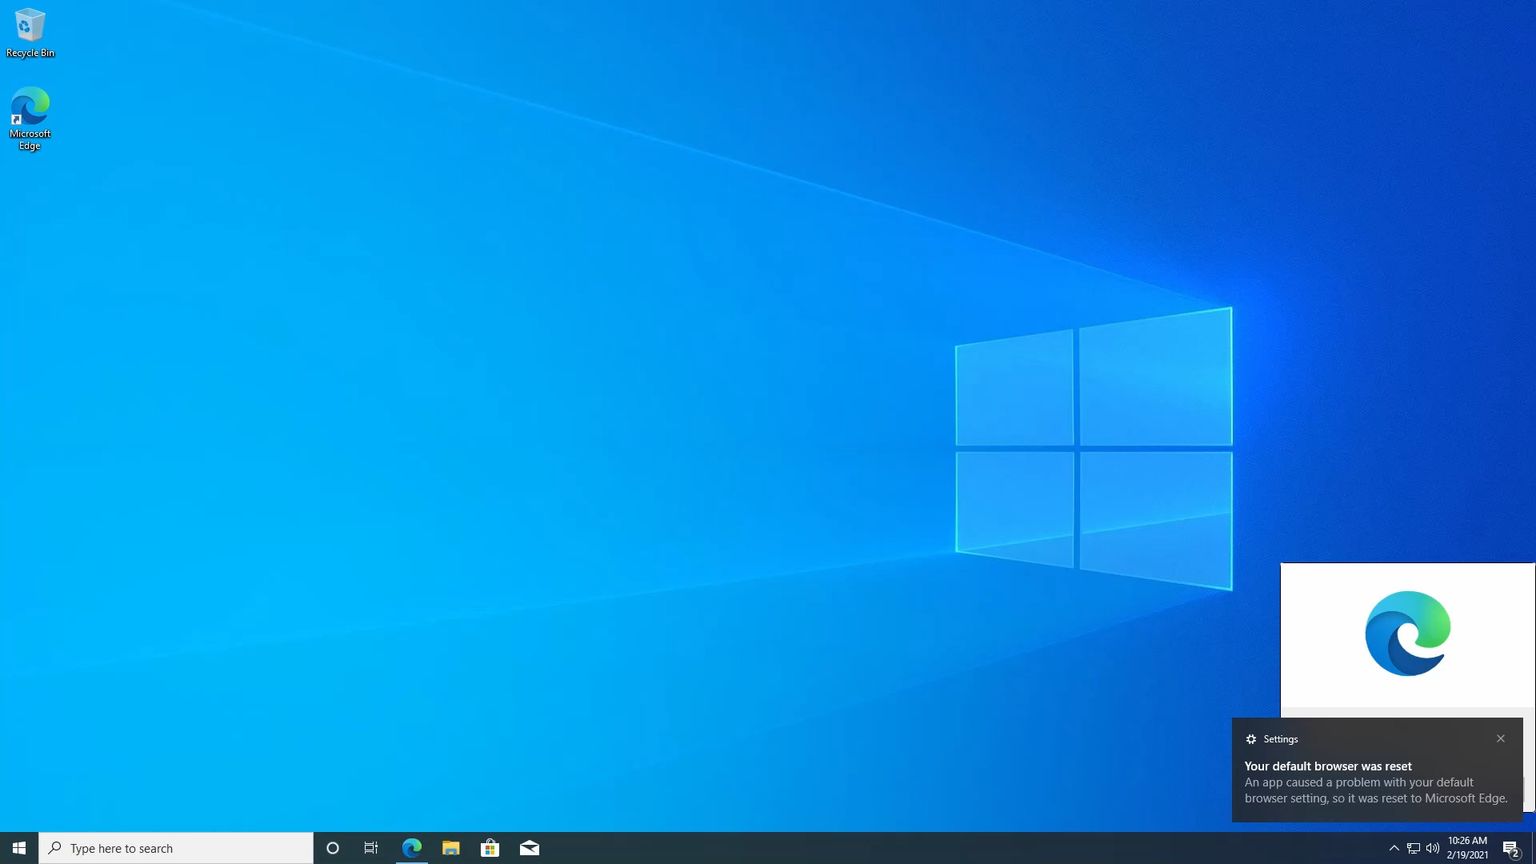
See additional setup for next steps.
Installing on a Shared Drive (Starting with Pop!_OS)
If you need to install both operating systems on a single drive (for example, if your computer only supports a single SSD), it is possible to install both OS's using a custom partition scheme. Pop!_OS's full-disk encryption is not supported with this setup.
Start by installing Pop!_OS, making sure to select Don't Encrypt during the installation process.
(System76 computers shipped with Pop!_OS give you the option of whether or not to encrypt on first boot. If you chose to encrypt at first boot, or if you reinstalled and chose to encrypt, you will need to reinstall without encrypting before proceeding. If you want to dual boot and also use full-disk encryption, you will need to use a dedicated drive instead.)
Shrinking Pop!_OS
Once Pop!_OS is installed (and not encrypted), boot into Recovery mode by holding down the spacebar during boot and selecting Pop!\_OS recovery from the list of boot options.

Once Recovery mode has finished loading, select your language and keyboard layout, then select Try Demo Mode in the bottom left to exit the installer.
Next, open GParted by searching for it in the Activities menu (SUPER) or the Pop!_Shell launcher (SUPER + /).
The Recovery partition is installed on the same drive as the main Pop!_OS install. Because of the Recovery location, GParted should automatically show the drive that Pop!_OS is installed to; otherwise, if GParted is showing a different drive (such as a flash drive), select the correct drive in the GParted -> Devices menu.
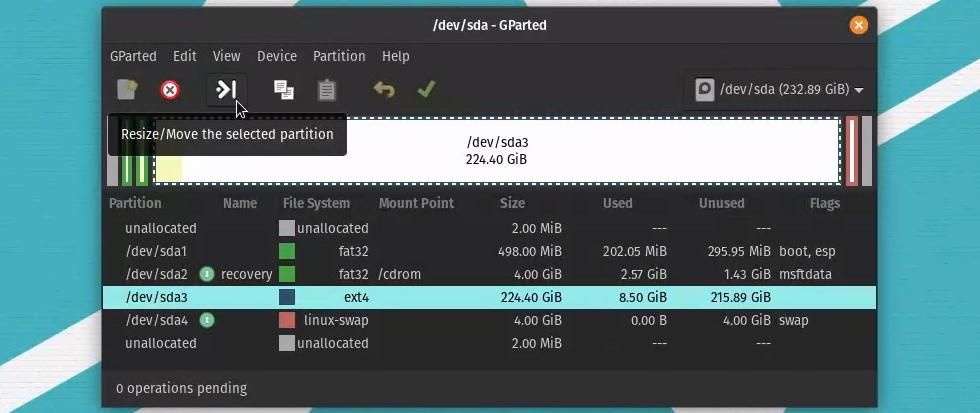
The largest partition in an unencrypted, default layout is an ext4 partition. Select this partition from the list, then click the Resize/Move button.
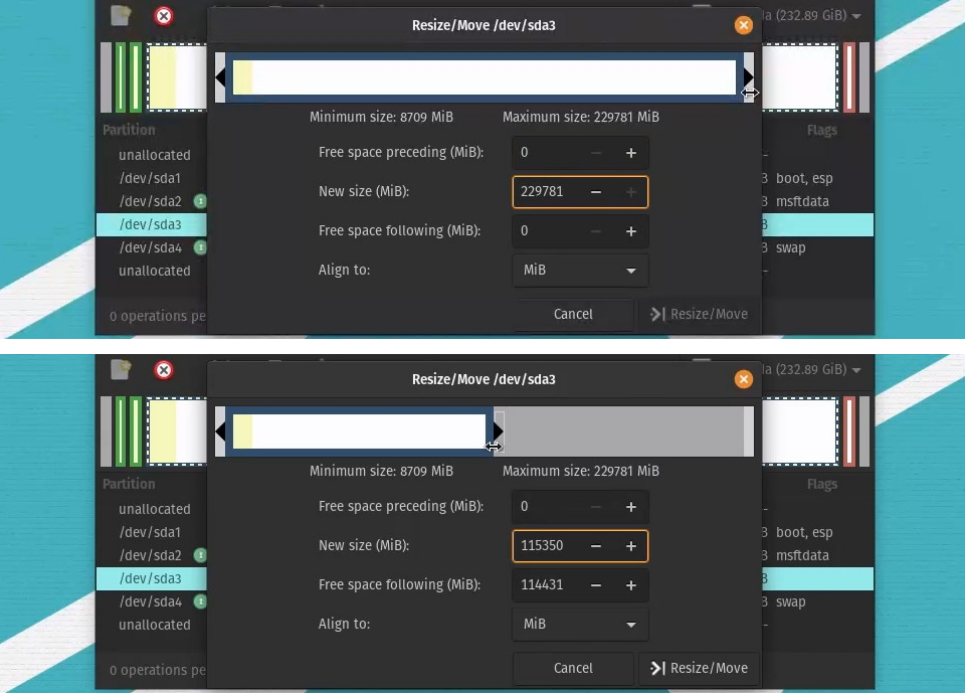
In the resizing dialog, drag the end of the partition to the left to shrink its size. (If you want the Pop!_OS partition to be a specific size, you can also enter the size value manually in the New size (MiB) text box.)
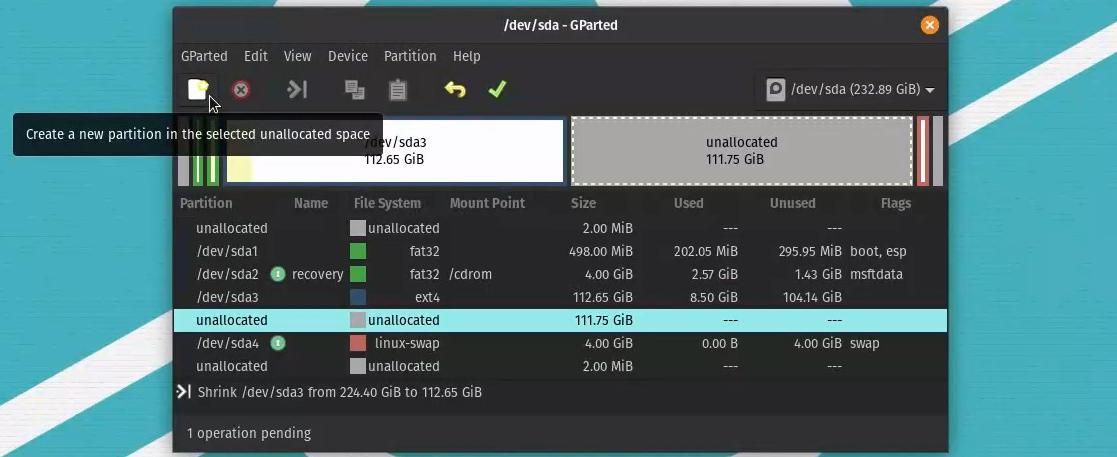
Click the Resize/Move button in the bottom right to confirm the change. Next, select the unallocated space immediately following the resized partition and click the New button to create a new partition for Windows.
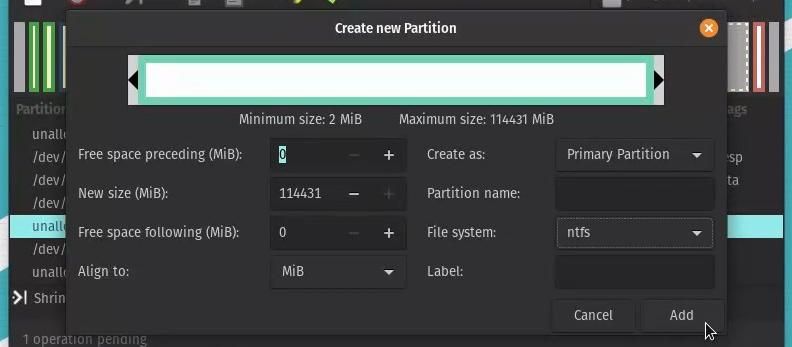
In the "Create new Partition" dialog, change the File system: dropdown to ntfs, then click Add to confirm the options.
Finally, click the Apply All Operations button (green check-mark) to write the changes to the disk.
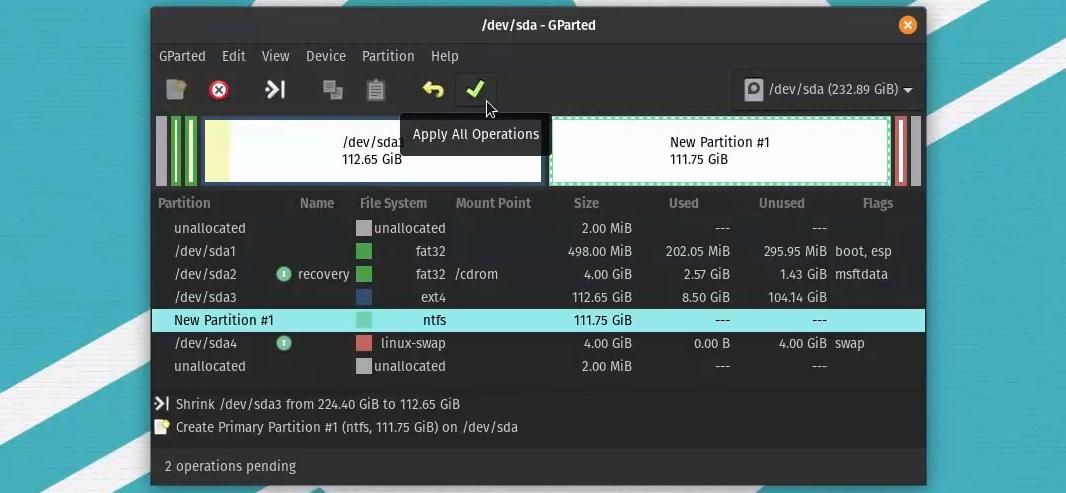
In the confirmation dialog, click Apply again to confirm.

Wait until all of the operations complete, then click the Close button.

Exit out of GParted and use the top-right menu to power off the system.
Starting the Windows installer
Plug the Windows install media into your machine, then power on while holding the appropriate key to enter the boot menu:
Escfor laptops with Open FirmwareF7for laptops with proprietary firmwareF8orF12for Thelio desktopsF10for Meerkat desktops
From the boot menu, select the drive containing the Windows installer, then wait for the installer to boot.
Performing the installation
Select your language, region, and keyboard settings, then click Next.

On the next page, click Install now.

On the Activate Windows page, enter your Windows product key, then click Next. If you don't have a product key, click I don't have a product key. (Usage of Windows without a product key may violate Microsoft's license terms for Windows, and some features may be limited or unavailable.)

If you didn't enter a product key, you will be asked to choose which version of Windows to install. The standard version for desktop and laptop computers is Windows 10 Home (if you're not sure which version to select, use this one.)

Next, you will be asked to read and accept Microsoft's license terms for Windows. To continue, check the I accept the license terms checkbox and click Next.

The next page will ask what type of installation you want to perform. Since there is no existing Windows installation to upgrade, select the Custom: Install Windows only (advanced) option.

Finally, the installer will ask you to select where you want to install to. In this scenario, we are installing Windows to a pre-made partition on the shared drive (if you're doing something else, see Planning the Installation).
Select the partition that matches the size and position in the list of what you created earlier using GParted. (Windows may select this partition automatically.) Click Next to install Windows to the partition.
Warning: You should not need to format any partitions during this step. If you see a
Windows can't be installed on drive # partition #message, either you have the wrong partition selected, or you did not selectNTFSas the partition type when creating the partition in GParted earlier. Try selecting a different partition, or go back to Shrinking Pop!_OS.
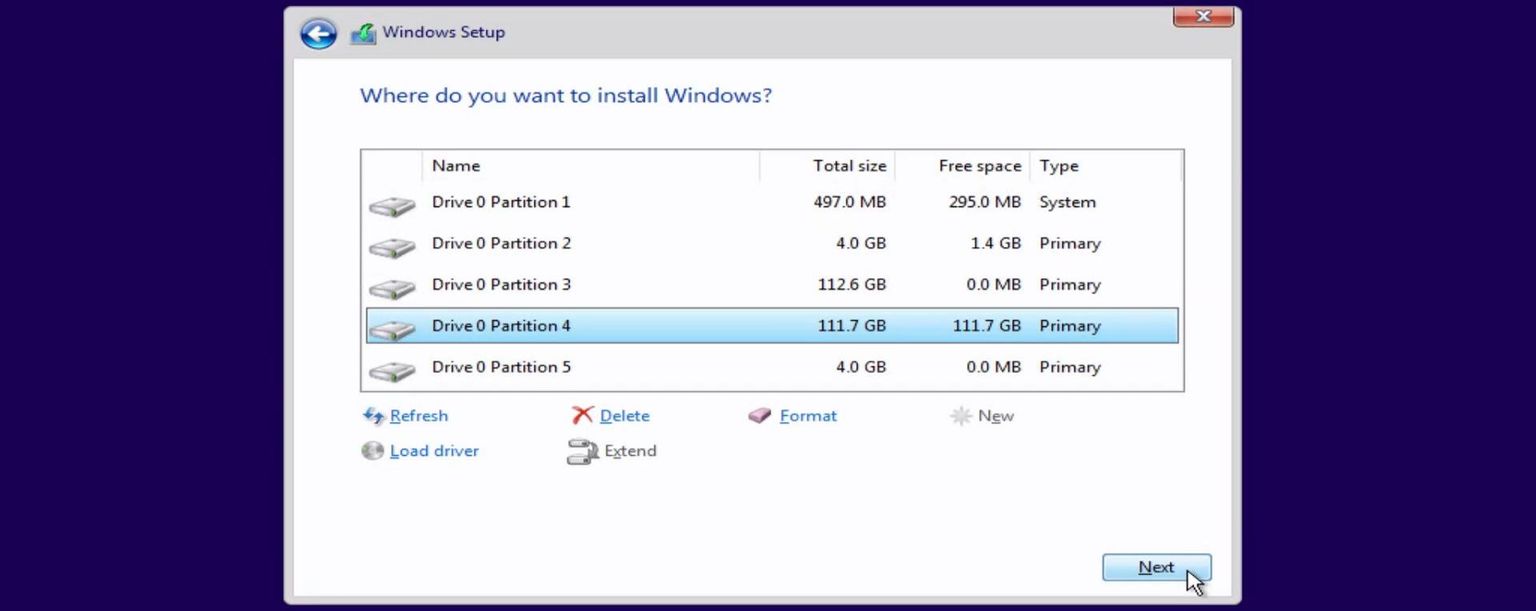
Next, wait for the Windows installation to complete. The installer will show progress as it copies and expands the OS files. The system may reboot one or more times.

If you see a message about checking the disk, wait and allow the installer to check its newly-created partitions.

Windows Set Up
After the install is completed, the system will reboot and then load the Windows set-up wizard. Select your country (it may be automatically selected if you're connected to the internet) and click Yes.

Follow the wizard to select your preferences for:
- Keyboard layout
- Network setup, if using WiFi
- Account details
- Privacy settings
- Cortana settings
After completing the wizard, Windows will display a slideshow while it finishes setting up. Once the set up is completed, you will see the Windows desktop:

See additional setup for next steps.
Additional Setup for Windows (not in VM)
Installing Drivers
After finishing the Windows installation, open Settings -> Update & Security and click Check for updates to install any drivers available through Windows Update first.

Click Restart now if you are prompted to restart to finish installing any updates. Repeat this process until no more updates are available.
NOTE: Keyboard backlight control is not supported within Windows on Open Firmware systems. The Device Manager app may report that some devices are missing drivers; this is normal and can be disregarded.
For System76 machines with Intel hardware, Windows Update is rather effective at finding drivers. We also recommend using Intel Driver Update Utility, which will automatically detect and install drivers for Intel hardware.
For our Open Firmware and Open EC systems, you can download the Windows drivers here.
For systems with NVIDIA graphics cards, drivers can be found here NVIDIA Drivers
NVIDIA Hardware Table
| Always | Maybe | Never |
|---|---|---|
| Adder WS | Darter Pro (w/ eGPU) | Lemur |
| Bonobo WS | Galago Pro (w/ eGPU) | Kudu |
| Leopard WS | Gazelle | Meerkat |
| Oryx Pro | Ratel | |
| Serval WS | Thelio | |
| Silverback WS | Wild Dog Pro |
Ethernet Hardware Table
| Realtek RTL8111/8168/8411 | Intel I219-V | Atheros/Killer Ethernet E2400 | Intel I210 |
|---|---|---|---|
| Oryx Pro | Meerkat | Serval WS | Silverback WS |
| Lemur | Wild Dog Pro | Bonobo WS | |
| Gazelle | Leopard WS | ||
| Kudu |
If there is a missing driver in the Device Manager, right click on the item with the missing driver, choose Properties, then Details, and then Hardware Ids from the drop-down. The VEN (vendor) and DEV (device) numbers are unique to every piece of hardware. Search for the device at the PCI Database:
You can use that info to find the manufacturer, then search for drivers.
Disabling Fast Startup
It is also recommended to disable "Fast Startup" within Windows to avoid problems switching between operating systems. To do this, navigate to Settings -> System -> Power & sleep and click Additional power settings in the right sidebar:
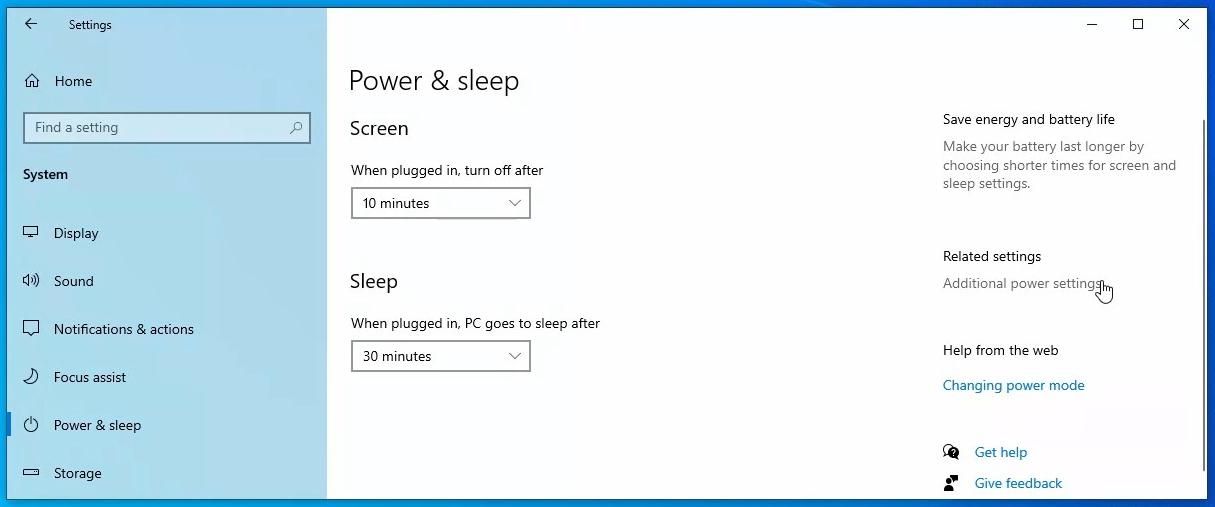
This will open another control panel. In this panel, click Choose what the power buttons do in the left sidebar.
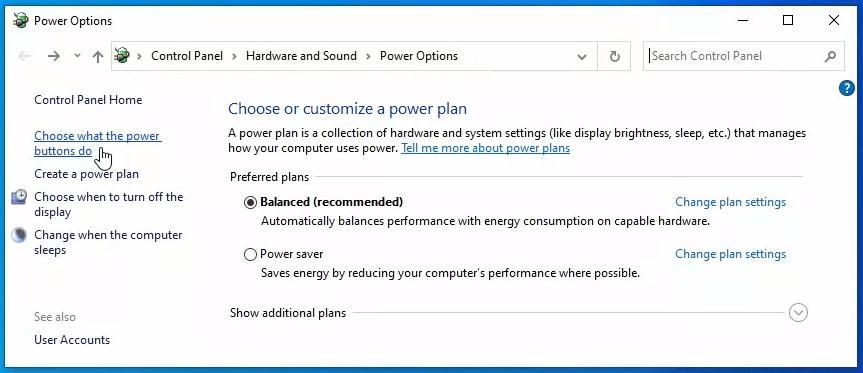
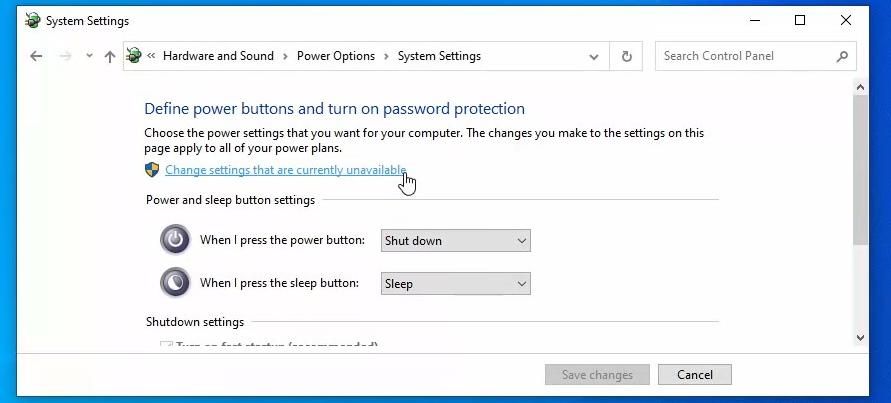
On the next page, click Change settings that are currently unavailable.
Finally, scroll down to the "Shutdown settings" section, uncheck the Turn on fast startup (recommended) option, and click Save changes.
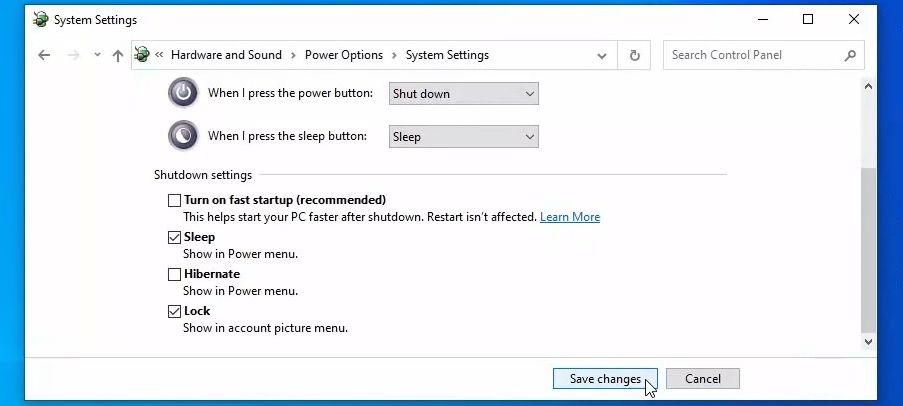
This will ensure Windows fully shuts down and allows other operating systems to use the hardware.
Selecting Pop!_OS or Windows
Depending on how you installed Windows and which firmware your computer is running, there are a variety of ways to choose which OS to boot.
Using the firmware boot menu
- Change the default OS using the UEFI setup menu (while booting, hold down
ESCon Open Firmware laptops,F2on closed firmware laptops,DELon Thelio desktops, orF2on Meerkat desktops.) - Navigate to the boot options and set the desired order, then save and exit.
- If there's more than one entry for an OS or drive, try them from top to bottom until you find the one that works.
- Boot the secondary OS using the UEFI boot menu (while booting, hold down
ESCon Open Firmware laptops,F7on closed firmware laptops,F8orF12on Thelio desktops, orF10on Meerkat desktops.) - Select the desired OS (or the drive that it's on.)
- If there's more than one entry for an OS or drive, try them from top to bottom until you find the one that works.
Using the systemd-boot menu
Systemd-boot is the bootloader used by Pop!_OS. It can be used to select which operating system you would like to boot from. The steps below outline how to access the systemd-boot menu, and select an operating system:
- This menu is part of Pop!_OS, so in order to use it effectively, Pop!_OS must be set as the default OS in the firmware settings as described in the previous section.
- Change the default OS using the
systemd-bootmenu (while booting, hold downSPACE.) - Highlight the desired default OS using the arrow keys, then press
Dto make it the default. - Boot the secondary OS using the
systemd-bootmenu (while booting, hold downSPACE). - Highlight the selected OS, then press
ENTERto boot. - Get prompted to choose the OS on every boot using the
systemd-bootmenu. - While booting, hold down
SPACEto enter the menu. - Press the
+key (orSHIFT+=) to increase the number of seconds the system will wait before booting the default OS; press-to decrease the number of seconds. - Once a timer is set, the menu will display on every boot without having to hold down
SPACE. (To reverse this, press-until the timer is back to zero.)
Repairing the Pop!_OS Bootloader
If Pop!_OS stops booting or no longer appears as a boot option after the Windows installation, or after a Windows update, see this article for information on repairing the Pop!_OS bootloader.
Fixing the System Clock
Windows and Linux store their time in the UEFI firmware differently. This can cause the clock to become de-synchronized when you switch from one OS to the other.
If you're affected by this, the easiest solution is to fix it in Linux, forcing it to work the same way as Windows. Set the option using this command:
timedatectl set-local-rtc 1 --adjust-system-clock
You can verify that the change was successful using this command:
timedatectl
You should see RTC in local TZ: yes in the output. If you need to revert this setting, turn it back off with this command:
timedatectl set-local-rtc 0 --adjust-system-clock